Глава 6. The Boot Loader GRUB
Содержание
Аннотация
This chapter describes how to configure GRUB (Grand Unified Bootloader), the boot loader used in openSUSE®. A special YaST module is available for configuring all settings. If you are not familiar with the subject of booting in Linux, read the following sections to acquire some background information. This chapter also describes some of the problems frequently encountered when booting with GRUB and their solutions.
This chapter focuses on boot management and the configuration of the boot loader GRUB. The boot procedure as a whole is outlined in Глава 5, Booting and Configuring a Linux System. A boot loader represents the interface between the machine (BIOS) and the operating system (openSUSE). The configuration of the boot loader directly impacts the start of the operating system.
The following terms appear frequently in this chapter and might need some explanation:
- MBR (Master Boot Record)
The structure of the MBR is defined by an operating system–independent convention. The first 446 bytes are reserved for the program code. They typically hold part of a boot loader program or an operating system selector. The next 64 bytes provide space for a partition table of up to four entries. The partition table contains information about the partitioning of the hard disk and the file system types. The operating system needs this table for handling the hard disk. With conventional generic code in the MBR, exactly one partition must be marked active. The last two bytes of the MBR must contain a static «magic number» (
AA55). An MBR containing a different value is regarded as invalid by some BIOSes, so is not considered for booting.- Boot Sectors
Boot sectors are the first sectors of hard disk partitions with the exception of the extended partition, which merely serves as a «container» for other partitions. These boot sectors have 512 bytes of space for code used to boot an operating system installed in the respective partition. This applies to boot sectors of formatted DOS, Windows, and OS/2 partitions, which also contain some basic important data of the file system. In contrast, the boot sectors of Linux partitions are initially empty after setting up a file system other than XFS. Therefore, a Linux partition is not bootable by itself, even if it contains a kernel and a valid root file system. A boot sector with valid code for booting the system has the same magic number as the MBR in its last two bytes (
AA55).
6.1. Booting with GRUB
GRUB comprises two stages. Stage 1 consists of 512 bytes and its only task is to load the second stage of the boot loader. Subsequently, stage 2 is loaded. This stage contains the main part of the boot loader.
In some configurations, an intermediate stage 1.5 can be used, which locates and loads stage 2 from an appropriate file system. If possible, this method is chosen by default on installation or when initially setting up GRUB with YaST.
Stage 2 is able to access many file systems. Currently, ext2, ext3,
ReiserFS, Minix, and the DOS FAT file system used by Windows are
supported. To a certain extent, XFS, and UFS and FFS used by BSD systems
are also supported. Since version 0.95 GRUB is also able to boot from a
CD or DVD containing an ISO 9660 standard file system pursuant to the
«El Torito» specification. Even before the system is booted,
GRUB can access file systems of supported BIOS disk devices (floppy
disks or hard disks, CD drives and DVD drives detected by the BIOS).
Therefore, changes to the GRUB configuration file
(menu.lst) do not require a new installation of the
boot manager. When the system is booted, GRUB reloads the menu file
with the valid paths and partition data of the kernel or the initial RAM
disk (initrd) and locates these files.
The actual configuration of GRUB is based on four files that are described below:
/boot/grub/menu.lstThis file contains all information about partitions or operating systems that can be booted with GRUB. Without this information, the GRUB command line prompts the user for how to proceed. For details, see Раздел 6.1.1.3, «Editing Menu Entries during the Boot Procedure».
/boot/grub/device.mapThis file translates device names from the GRUB and BIOS notation to Linux device names.
/etc/grub.confThis file contains the commands, parameters and options the GRUB shell needs for installing the boot loader correctly.
/etc/sysconfig/bootloaderThis file is read by the perl-bootloader library which is used when configuring the bootloader with YaST and every time a new kernel is installed. It contains configuration options (such as kernel parameters) that will be added by default to the bootloader configuration file.
GRUB can be controlled in various ways. Boot entries from an existing
configuration can be selected from the graphical menu (splash screen).
The configuration is loaded from the file menu.lst.
In GRUB, all boot parameters can be changed prior to booting. For
example, errors made when editing the menu file can be corrected in this
way. Boot commands can also be entered interactively at a kind of input
prompt. For details, see Раздел 6.1.1.3, «Editing Menu Entries during the Boot Procedure». GRUB
offers the possibility of determining the location of the kernel and the
initrd prior to booting. In this way, you can even
boot an installed operating system for which no entry exists in the boot
loader configuration.
GRUB actually exists in two versions: as a boot loader and as a normal
Linux program in /usr/sbin/grub. The latter is
referred to as the GRUB shell. It provides an
emulation of GRUB in the installed system and can be used to install
GRUB or test new settings before applying them. The functionality to
install GRUB as the boot loader on a hard disk or floppy disk is
integrated in GRUB in the form of the command setup.
This is available in the GRUB shell when Linux is loaded.
6.1.1. The File /boot/grub/menu.lst
The graphical splash screen with the boot menu is based on the GRUB
configuration file /boot/grub/menu.lst, which
contains all information about all partitions or operating systems that
can be booted by the menu.
Every time the system is booted, GRUB loads the menu file from the file system. For this reason, GRUB does not need to be reinstalled after every change to the file. Use the YaST boot loader to modify the GRUB configuration as described in Раздел 6.2, «Configuring the Boot Loader with YaST».
The menu file contains commands. The syntax is very simple. Every line
contains a command followed by optional parameters separated by spaces
like in the shell. For historical reasons, some commands permit an
= in front of the first parameter. Comments are
introduced by a hash (#).
To identify the menu items in the menu overview, set a
title for every entry. The text (including any
spaces) following the keyword title is displayed as a
selectable option in the menu. All commands up to the next
title are executed when this menu item is selected.
The simplest case is the redirection to boot loaders of other operating
systems. The command is chainloader and the argument
is usually the boot block of another partition, in GRUB block
notation. For example:
chainloader (hd0,3)+1
The device names in GRUB are explained in Раздел 6.1.1.1, «Naming Conventions for Hard Disks and Partitions». This example specifies the first block of the fourth partition of the first hard disk.
Use the command kernel to specify a kernel image. The
first argument is the path to the kernel image in a partition. The other
arguments are passed to the kernel on its command line.
If the kernel does not have built-in drivers for access to the root
partition or a recent Linux system with advanced hotplug features is
used, initrd must be specified with a separate
GRUB command whose only argument is the path to the
initrd file. Because the loading address of the
initrd is written into the loaded kernel image, the
command initrd must follow after the
kernel command.
The command root simplifies the specification of
kernel and initrd files. The only argument of root is
a device or a partition. This device is used for all kernel,
initrd, or other file paths for which no device is
explicitly specified until the next root command.
The boot command is implied at the end of every menu
entry, so it does not need to be written into the menu file. However, if
you use GRUB interactively for booting, you must enter the
boot command at the end. The command itself has no
arguments. It merely boots the loaded kernel image or the specified
chain loader.
After writing all menu entries, define one of them as the
default entry. Otherwise, the first one (entry
0) is used. You can also specify a time-out in
seconds after which the default entry should boot.
timeout and default usually
precede the menu entries. An example file is described in
Раздел 6.1.1.2, «An Example Menu File».
6.1.1.1. Naming Conventions for Hard Disks and Partitions
The naming convention GRUB uses for hard disks and partitions differ
from that used for normal Linux devices. It more closely resembles the
simple disk enumeration the BIOS does and the syntax is similar to that
used in some BSD derivatives. In GRUB, the numbering of the
partitions start with zero. This means that
(hd0,0) is the first partition of the first hard
disk. On a common desktop machine with a hard disk connected as primary
master, the corresponding Linux device name is
/dev/sda1.
The four possible primary partitions are assigned the partition numbers
0 to 3. The logical partitions
are numbered from 4:
(hd0,0)   first primary partition of the first hard disk
(hd0,1)   second primary partition
(hd0,2)   third primary partition
(hd0,3)   fourth primary partition (usually an extended partition)
(hd0,4)   first logical partition
(hd0,5)   second logical partition
Being dependent on BIOS devices, GRUB does not distinguish between PATA (IDE), SATA, SCSI, and hardware RAID devices. All hard disks recognized by the BIOS or other controllers are numbered according to the boot sequence preset in the BIOS.
Unfortunately, it is often not possible to map the Linux device names
to BIOS device names exactly. It generates this mapping with the help
of an algorithm and saves it to the file
device.map, which can be edited if necessary.
Information about the file device.map is available
in Раздел 6.1.2, «The File device.map».
A complete GRUB path consists of a device name written in parentheses and the path to the file in the file system in the specified partition. The path begins with a slash. For example, the bootable kernel could be specified as follows on a system with a single PATA (IDE) hard disk containing Linux in its first partition:
(hd0,0)/boot/vmlinuz
6.1.1.2. An Example Menu File
The following example shows the structure of a GRUB menu file. The
example installation has a Linux boot partition under
/dev/sda5, a root partition under
/dev/sda7 and a Windows installation under
/dev/sda1.
gfxmenu (hd0,4)/boot/messagecolor white/blue black/light-gray
default 0
timeout 8
title
       linux
root (hd0,4) kernel /boot/vmlinuz root=/dev/sda7 vga=791 resume=/dev/sda9 initrd /boot/initrd title windows
rootnoverify (hd0,0) chainloader +1 title floppy
rootnoverify (hd0,0) chainloader (fd0)+1 title failsafe
root (hd0,4) kernel /boot/vmlinuz.shipped root=/dev/sda7 ide=nodma \ apm=off acpi=off vga=normal nosmp maxcpus=0 3 noresume initrd /boot/initrd.shipped
The first block defines the configuration of the splash screen:
|
The background image |
| Color scheme: white (foreground), blue (background), black (selection) and light gray (background of the selection). The color scheme has no effect on the splash screen, only on the customizable GRUB menu that you can access by exiting the splash screen with Esc. |
|
The first ( |
|
After eight seconds without any user input, GRUB automatically
boots the default entry. To deactivate automatic boot, delete the
|
The second and largest block lists the various bootable operating
systems. The sections for the individual operating systems are
introduced by title.
|
The first entry ( |
|
The second entry is responsible for loading Windows. Windows is
booted from the first partition of the first hard disk
( |
| The next entry enables booting from floppy disk without modifying the BIOS settings. |
|
The boot option |
The menu file can be changed whenever necessary. GRUB then uses the modified settings during the next boot. Edit the file permanently using YaST or an editor of your choice. Alternatively, make temporary changes interactively using the edit function of GRUB. See Раздел 6.1.1.3, «Editing Menu Entries during the Boot Procedure».
6.1.1.3. Editing Menu Entries during the Boot Procedure
In the graphical boot menu, select the operating system to boot with the arrow keys. If you select a Linux system, you can enter additional boot parameters at the boot prompt. To edit individual menu entries directly, press Esc to exit the splash screen and get to the GRUB text-based menu then press E. Changes made in this way only apply to the current boot and are not adopted permanently.
![[Important]](admon/important.png) | Keyboard Layout during the Boot Procedure |
|---|---|
The US keyboard layout is the only one available when booting. See Рисунок “US Keyboard Layout” (↑Вступление). | |
Editing menu entries facilitates the repair of a defective system that can no longer be booted, because the faulty configuration file of the boot loader can be circumvented by manually entering parameters. Manually entering parameters during the boot procedure is also useful for testing new settings without impairing the native system.
After activating the editing mode, use the arrow keys to select the menu entry of the configuration to edit. To make the configuration editable, press E again. In this way, edit incorrect partitions or path specifications before they have a negative effect on the boot process. Press Enter to exit the editing mode and return to the menu. Then press B to boot this entry. Further possible actions are displayed in the help text at the bottom.
To enter changed boot options permanently and pass them to the kernel,
open the file menu.lst as the user
root and append the
respective kernel parameters to the existing line, separated by spaces:
title linux
   root(hd0,0)
     kernel /vmlinuz root=/dev/sda3 additional parameter
   initrd /initrd
GRUB automatically adopts the new parameters the next time the system is booted. Alternatively, this change can also be made with the YaST boot loader module. Append the new parameters to the existing line, separated by spaces.
6.1.2. The File device.map
The file device.map maps GRUB and BIOS device
names to Linux device names. In a mixed system containing PATA (IDE) and
SCSI hard disks, GRUB must try to determine the boot sequence by a
special procedure, because GRUB may not have access to the BIOS
information on the boot sequence. GRUB saves the result of this
analysis in the file /boot/grub/device.map. Example
device.map files for a system on which the boot
sequence in the BIOS is set to PATA before SCSI could look as follows:
(fd0)  /dev/fd0
(hd0)  /dev/sda
(hd1)  /dev/sdb
or
(fd0) /dev/fd0 (hd0) /dev/disk-by-id/DISK1 ID(hd1) /dev/disk-by-id/DISK2 ID
Because the order of PATA (IDE), SCSI and other hard disks depends on
various factors and Linux is not able to identify the mapping, the
sequence in the file device.map can be set
manually. If you encounter problems when booting, check if the sequence
in this file corresponds to the sequence in the BIOS and use the GRUB
prompt to modify it temporarily, if necessary. After the Linux system
has booted, the file device.map can be edited
permanently with the YaST boot loader module or an editor of your
choice.
After manually changing device.map, execute the
following command to reinstall GRUB. This command causes the file
device.map to be reloaded and the commands listed
in grub.conf to be executed:
grub --batch < /etc/grub.conf
6.1.3. The File /etc/grub.conf
The third important GRUB configuration file after
menu.lst and device.map is
/etc/grub.conf. This file contains the commands,
parameters and options the GRUB shell needs for installing the boot
loader correctly:
setup --stage2=/boot/grub/stage2 --force-lba (hd0,1) (hd0,1)
   quit
This command tells GRUB to automatically install the boot loader to
the second partition on the first hard disk (hd0,1) using the boot
images located on the same partition. The
--stage2=/boot/grub/stage2 parameter is needed to
install the stage2 image from a mounted file
system. Some BIOSes have a faulty LBA support implementation,
--force-lba provides a solution to ignore them.
6.1.4. The File /etc/sysconfig/bootloader
This configuration file is only used when configuring the bootloader
with YaST and every time a new kernel is installed. It is evaluated by
the perl-bootloader library which modifies the bootloader configuration
file (for example /boot/grub/menu.lst for GRUB)
accordingly. /etc/sysconfig/bootloader is not a
GRUB specific configuration file - the values are applied to any
bootloader installed on openSUSE.
![[Note]](admon/note.png) | Bootloader Configuration after a Kernel Update |
|---|---|
Every time a new kernel is installed, the perl bootloader writes a new
bootloader configuration file (for example
| |
LOADER_TYPESpecifies the bootloader installed on the system (e.g. GRUB or LILO). Do not modify—use YaST to change the bootloader as described in Процедура 6.6, «Changing the Boot Loader Type».
DEFAULT_VGA / FAILSAFE_VGA / XEN_VGAScreen resolution and color depth of the framebuffer used during booting are configured with the kernel parameter
vga. These values define which resolution and color depth to use for the default boot entry, the failsafe and the XEN entry. The following values are valid:Таблица 6.1. Screen Resolution and Color Depth Reference
640x480
800x600
1024x768
1280x1024
1600x1200
8bit
0x301
0x303
0x305
0x307
0x31C
15bit
0x310
0x313
0x316
0x319
0x31D
16bit
0x311
0x314
0x317
0x31A
0x31E
24bit
0x312
0x315
0x318
0x31B
0x31F
DEFAULT_APPEND / FAILSAFE_APPEND / XEN_KERNEL_APPENDKernel parameters (other than
vga) that are automatically appended to the default, failsafe and XEN boot entries in the bootloader configuration file.CYCLE_DETECTION / CYCLE_NEXT_ENTRYConfigure whether to use boot cycle detection and if so, which alternative entry from
/boot/grub/menu.lstto boot in case of a reboot cycle (e.g.Failsafe). See/usr/share/doc/packages/bootcycle/READMEfor detailed information.
6.1.5. Setting a Boot Password
Even before the operating system is booted, GRUB enables access to file systems. Users without root permissions can access files in your Linux system to which they have no access once the system is booted. To block this kind of access or to prevent users from booting certain operating systems, set a boot password.
| Boot Password and Splash Screen |
|---|---|
If you use a boot password for GRUB, the usual splash screen is not displayed. | |
As the user root, proceed as follows to set a boot
password:
At the root prompt, encrypt the password using grub-md5-crypt:
# grub-md5-crypt
Password: ****
Retype password: ****
Encrypted: $1$lS2dv/$JOYcdxIn7CJk9xShzzJVw/
Paste the encrypted string into the global section of the file
menu.lst:gfxmenu (hd0,4)/message color white/blue black/light-gray default 0 timeout 8 password --md5 $1$lS2dv/$JOYcdxIn7CJk9xShzzJVw/
Now GRUB commands can only be executed at the boot prompt after pressing P and entering the password. However, users can still boot all operating systems from the boot menu.
To prevent one or several operating systems from being booted from the boot menu, add the entry
lockto every section inmenu.lstthat should not be bootable without entering a password. For example:title linux kernel (hd0,4)/vmlinuz root=/dev/sda7 vga=791 initrd (hd0,4)/initrd lock
After rebooting the system and selecting the Linux entry from the boot menu, the following error message is displayed:
Error 32: Must be authenticated
Press Enter to enter the menu. Then press P to get a password prompt. After entering the password and pressing Enter, the selected operating system (Linux in this case) should boot.
6.2. Configuring the Boot Loader with YaST
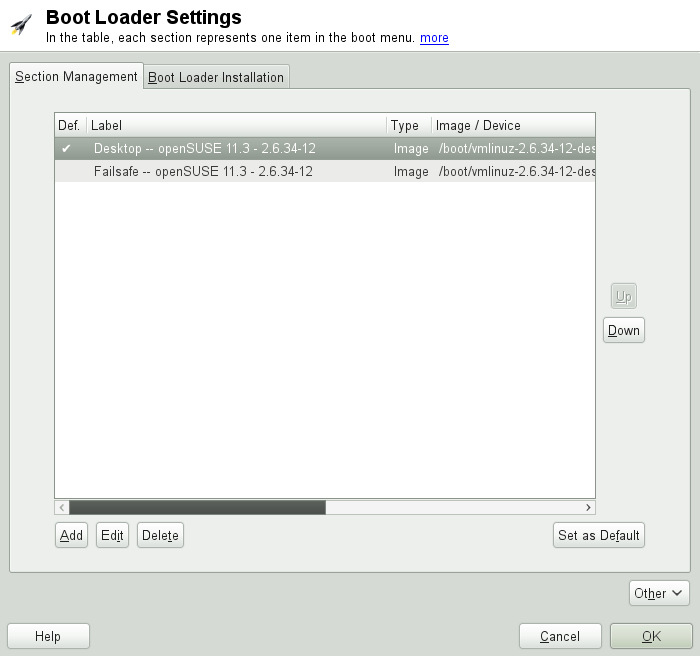
The easiest way to configure the boot loader in your openSUSE system is to use the YaST module. In the YaST Control Center, select +. As in Рисунок 6.1, «Boot Loader Settings», this shows the current boot loader configuration of your system and allows you to make changes.
Use the tab to edit, change and delete boot loader sections for the individual operating systems. To add an option, click . To change the value of an existing option, select it with the mouse and click . To remove an existing entry, select it and click . If you are not familiar with boot loader options, read Раздел 6.1, «Booting with GRUB» first.
Use the tab to view and change settings related to type, location and advanced loader settings.
Click to access advanced configuration options. The build-in editor lets you change the GRUB configuration files. For details, see Раздел 6.1, «Booting with GRUB». You can also delete the existing configuration and or let YaST . It is also possible to write the configuration to disk or reread the configuration from the disk. To restore the original Master Boot Record (MBR) that was saved during the installation, choose .
6.2.1. Adjusting the Default Boot Entry
To change the system that is booted by default, proceed as follows:
Процедура 6.1. Setting the Default System
Open the tab.
Select the desired entry from the list.
Click .
Click to activate these changes.
6.2.2. Modifying the Boot Loader Location
To modify the location of the boot loader, follow these steps:
Процедура 6.2. Changing the Boot Loader Location
Select the tab and then choose one of the following options for :
This installs the boot loader in the MBR of the first disk (according to the boot sequence preset in the BIOS).
This installs the boot loader in the boot sector of the
/partition (this is the default).This installs the boot loader in the boot sector of the
/bootpartition.This installs the boot loader in the extended partition container.
Use this option to specify the location of the boot loader manually.
Click to apply your changes.
6.2.3. Changing the Boot Loader Time-Out
The boot loader does not boot the default system immediately. During the time-out, you can select the system to boot or write some kernel parameters. To set the boot loader time-out, proceed as follows:
Процедура 6.3. Changing the Boot Loader Time-Out
Open the tab.
Click .
Change the value of by typing in a new value and clicking the appropriate arrow key with your mouse, or by using the arrow keys on the keyboard.
Click twice to save the changes.
![[Warning]](admon/warning.png) | Timeout of 0 Seconds |
|---|---|
When setting the timeout to 0 seconds, you will not be able to access GRUB during boot time. When having set the default boot option to a non-Linux operation system at the same time, this effectively disables access to the Linux system. | |
6.2.4. Setting a Boot Password
Using this YaST module, you can also set a password to protect booting. This gives you an additional level of security.
Процедура 6.4. Setting a Boot Loader Password
Open the tab.
Click .
Activate the option with a click and type in your twice.
Click twice to save the changes.
6.2.5. Adjusting the Disk Order
If your computer has more than one hard disk, you can specify the boot sequence of the disks to match the BIOS setup of the machine (see Раздел 6.1.2, «The File device.map»). To do so, proceed as follows:
Процедура 6.5. Setting the Disk Order
Open the tab.
Click .
If more than one disk is listed, select a disk and click or to reorder the displayed disks.
Click two times to save the changes.
6.2.6. Configuring Advanced Options
Advanced boot options can be configured via +. Normally, it should not be necessary to change the default settings.
Activates the partition that contains the boot loader. Some legacy operating systems (such as Windows 98) can only boot from an active partition.
Replaces the current MBR with generic, operating system independent code.
Sets GRUB in debug mode where it displays messages to show disk activity.
Hides the boot menu and boots the default entry.
When hiding the boot menu, you will not be able to access GRUB during boot time. When having set the default boot option to a non-Linux operation system at the same time, this effectively disables access to the Linux system.
Starts the Trusted GRUB which supports trusted computing functionality.
Enables or disables acoustic signals in GRUB.
Path to the graphics file used when displaying the boot screen.
If your machine is controlled via a serial console, activate this option and specify which COM port to use at which speed. See info grub or http://www.gnu.org/software/grub/manual/grub.html#Serial-terminal
6.2.7. Changing Boot Loader Type
Set the boot loader type in . The default boot loader in openSUSE is GRUB. To use LILO or ELILO, proceed as follows:
| LILO is unsupported |
|---|---|
Using LILO is not recommended—it is unsupported on openSUSE. Only use it in special cases. | |
Процедура 6.6. Changing the Boot Loader Type
Select the tab.
For , select .
In the dialog box that opens, select one of the following actions:
Have YaST propose a new configuration.
Have YaST convert the current configuration. When converting the configuration, some settings may be lost.
Write a custom configuration. This action is not available during the installation of openSUSE.
Load your own
/etc/lilo.conf. This action is not available during the installation of openSUSE.
Click two times to save the changes.
During the conversion, the old GRUB configuration is saved to the disk. To use it, simply change the boot loader type back to GRUB and choose . This action is available only on an installed system.
| Custom Boot Loader |
|---|---|
To use a boot loader other than GRUB or LILO, select . Read the documentation of your boot loader carefully before choosing this option. | |
6.3. Uninstalling the Linux Boot Loader
YaST can be used to uninstall the Linux boot loader and restore the MBR to the state it had prior to the installation of Linux. During the installation, YaST automatically creates a backup copy of the original MBR and restores it upon request.
To uninstall GRUB, start YaST and click + to start the boot loader module. Select + and confirm with .
6.4. Creating Boot CDs
If problems occur while booting your system using a boot manager or if the boot manager cannot be installed on your hard disk disk, it is also possible to create a bootable CD with all the necessary start-up files for Linux. This requires a CD writer be installed in your system.
Creating a bootable CD-ROM with GRUB merely requires a special form of
stage2 called stage2_eltorito
and, optionally, a customized menu.lst. The classic
files stage1 and stage2 are not
required.
Процедура 6.7. Creating Boot CDs
Change into a directory in which to create the ISO image, for example: cd
/tmpCreate a subdirectory for GRUB and change into the newly created
isodirectory:mkdir -p iso/boot/grub && cd iso
Copy the kernel, the files
stage2_eltorito,initrd,menu.lstandmessagetoiso/boot/:cp /boot/vmlinuz boot/ cp /boot/initrd boot/ cp /boot/message boot/ cp /usr/lib/grub/stage2_eltorito boot/grub cp /boot/grub/menu.lst boot/grub
Replace the
root (hdentries withx,y)root (cd)to point to the CD_ROM device. You may also need to adjust the paths to the message file, the kernel and the initrd—they need to point to/boot/message,/boot/vmlinuzand/boot/initrd, respectively. After having made the adjustments,menu.lstshould look similar to the following example:timeout 8 default 0 gfxmenu (cd)/boot/message title Linux root (cd) kernel /boot/vmlinuz root=/dev/sda5 vga=794 resume=/dev/sda1 \ splash=verbose showopts initrd /boot/initrd
Use
splash=silentinstead ofsplash=verboseto prevent the boot messages from appearing during the boot procedure.Create the ISO image with the following command:
genisoimage -R -b boot/grub/stage2_eltorito -no-emul-boot \
-boot-load-size 4 -boot-info-table -iso-level 2 -input-charset utf-8 \
-o grub.iso /tmp/iso
Write the resulting file
grub.isoto a CD using your preferred utility. Do not burn the ISO image as a data file, but use the option for burning a CD image in your burning utility.
6.5. The Graphical SUSE Screen
The graphical SUSE screen is displayed on the first console if the
option vga= is used as a
kernel parameter. If you install using YaST, this option is
automatically activated in accordance with the selected resolution and
the graphics card. There are three ways to disable the SUSE screen, if
desired:
value
- Disabling the SUSE Screen When Necessary
Enter the command echo 0 >/proc/splash on the command line to disable the graphical screen. To activate it again, enter echo 1 >/proc/splash.
- Disabling the SUSE screen by default
Add the kernel parameter
splash=0to your boot loader configuration. Глава 6, The Boot Loader GRUB provides more information about this. However, if you prefer the text mode (the default in earlier versions) setvga=normal.- Completely Disabling the SUSE Screen
Compile a new kernel and disable the option in . Disabling framebuffer support in the kernel automatically disables the splash screen, as well.
No Support SUSE cannot provide any support for your system if you run it with a custom kernel.
6.6. Troubleshooting
This section lists some of the problems frequently encountered when booting with GRUB and a short description of possible solutions. Some of the problems are covered in articles in the Support Database at http://en.opensuse.org/Portal:Support_database. Use the search dialog to search for keywords like GRUB, boot and boot loader.
- GRUB and XFS
XFS leaves no room for
stage1in the partition boot block. Therefore, do not specify an XFS partition as the location of the boot loader. This problem can be solved by creating a separate boot partition that is not formatted with XFS.- GRUB Reports GRUB Geom Error
GRUB checks the geometry of connected hard disks when the system is booted. Sometimes, the BIOS returns inconsistent information and GRUB reports a GRUB Geom Error. In this case, update the BIOS.
GRUB also returns this error message if Linux was installed on an additional hard disk that is not registered in the BIOS. stage1 of the boot loader is found and loaded correctly, but stage2 is not found. This problem can be remedied by registering the new hard disk in the BIOS.
- System Containing Several Hard Disks Does Not Boot
During the installation, YaST may have incorrectly determined the boot sequence of the hard disks. For example, GRUB may regard the PATA (IDE) disk as
hd0and the SCSI disk ashd1, although the boot sequence in the BIOS is reversed (SCSI before PATA).In this case, correct the hard disks during the boot process with the help of the GRUB command line. After the system has booted, edit
device.mapto apply the new mapping permanently. Then check the GRUB device names in the files/boot/grub/menu.lstand/boot/grub/device.mapand reinstall the boot loader with the following command:grub --batch < /etc/grub.conf
- Booting Windows from the Second Hard Disk
Some operating systems, such as Windows, can only boot from the first hard disk. If such an operating system is installed on a hard disk other than the first hard disk, you can effect a logical change for the respective menu entry.
...
title windows
   map (hd0) (hd1)
   map (hd1) (hd0)
   chainloader(hd1,0)+1
...
In this example, Windows is started from the second hard disk. For this purpose, the logical order of the hard disks is changed with
map. This change does not affect the logic within the GRUB menu file. Therefore, the second hard disk must be specified forchainloader.
6.7. For More Information
Extensive information about GRUB is available at http://www.gnu.org/software/grub/. Also refer to the grub info page. You can also search for the keyword «GRUB» in the Support Database at http://en.opensuse.org/Portal:Support_database to get information about special issues.