Глава 11. The Domain Name System
Содержание
Аннотация
DNS (domain name system) is needed to resolve the domain names and
hostnames into IP addresses. In this way, the IP address 192.168.2.100 is
assigned to the hostname jupiter, for example. Before
setting up your own name server, read the general information about DNS
in Раздел 9.3, «Name Resolution». The following configuration
examples refer to BIND.
11.1. DNS Terminology
- Zone
The domain namespace is divided into regions called zones. For instance, if you have
example.com, you have theexamplesection (or zone) of thecomdomain.- DNS server
The DNS server is a server that maintains the name and IP information for a domain. You can have a primary DNS server for master zone, a secondary server for slave zone, or a slave server without any zones for caching.
- Master zone DNS server
The master zone includes all hosts from your network and a DNS server master zone stores up-to-date records for all the hosts in your domain.
- Slave zone DNS server
A slave zone is a copy of the master zone. The slave zone DNS server obtains its zone data with zone transfer operations from its master server. The slave zone DNS server responds authoritatively for the zone as long as it has valid (not expired) zone data. If the slave cannot obtain a new copy of the zone data, it stops responding for the zone.
- Forwarder
Forwarders are DNS servers to which your DNS server should send queries it cannot answer. To enable different configuration sources in one configuration,
netconfigis used (see also man 8 netconfig).- Record
The record is information about name and IP address. Supported records and their syntax are described in BIND documentation. Some special records are:
- NS record
An NS record tells name servers which machines are in charge of a given domain zone.
- MX record
The MX (mail exchange) records describe the machines to contact for directing mail across the Internet.
- SOA record
SOA (Start of Authority) record is the first record in a zone file. The SOA record is used when using DNS to synchronize data between multiple computers.
11.2. Installation
To install a DNS server, start YaST and select +. Choose + and select . Confirm the installation of the dependent packages to finish the installation process.
11.3. Configuration with YaST
Use the YaST DNS module to configure a DNS server for the local network. When starting the module for the first time, a wizard starts, prompting you to make a few decisions concerning administration of the server. Completing this initial setup produces a basic server configuration. Use the expert mode to deal with more advanced configuration tasks, such as setting up ACLs, logging, TSIG keys, and other options.
11.3.1. Wizard Configuration
The wizard consists of three steps or dialogs. At the appropriate places in the dialogs, you are given the opportunity to enter the expert configuration mode.
When starting the module for the first time, the dialog, shown in Рисунок 11.1, «DNS Server Installation: Forwarder Settings», opens. The decides which devices should provide forwarders or whether you want to supply your own . For more information about netconfig, see man 8 netconfig.
Forwarders are DNS servers to which your DNS server sends queries it cannot answer itself. Enter their IP address and click .
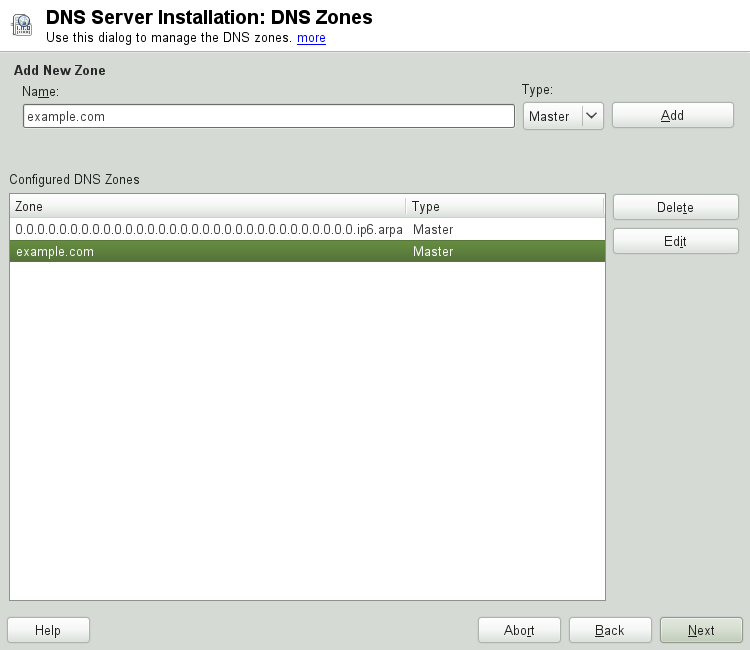
The dialog consists of several parts and is responsible for the management of zone files, described in Раздел 11.6, «Zone Files». For a new zone, provide a name for it in . To add a reverse zone, the name must end in
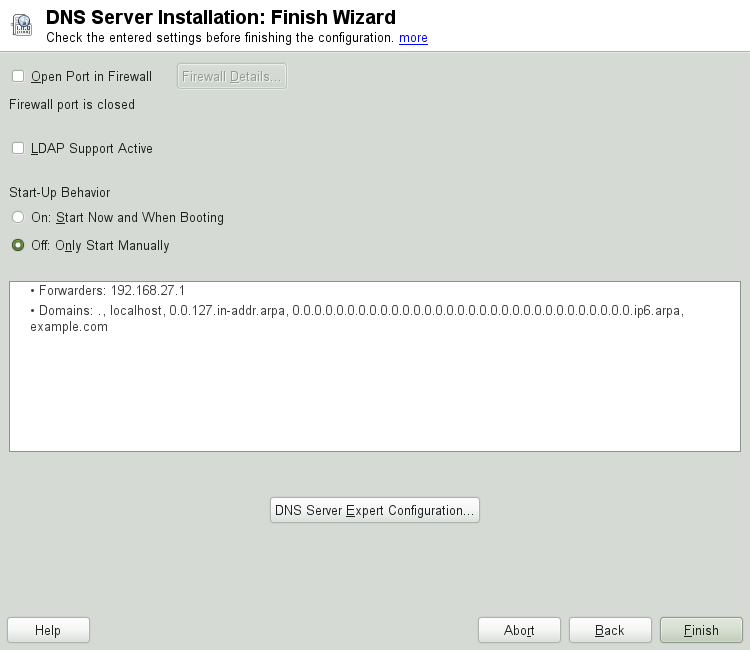
.in-addr.arpa. Finally, select the (master, slave, or forward). See Рисунок 11.2, «DNS Server Installation: DNS Zones». Click to configure other settings of an existing zone. To remove a zone, click .In the final dialog, you can open the DNS port in the firewall by clicking . Then decide whether to start the DNS server when booting ( or ). You can also activate LDAP support. See Рисунок 11.3, «DNS Server Installation: Finish Wizard».

11.3.2. Expert Configuration
After starting the module, YaST opens a window displaying several configuration options. Completing it results in a DNS server configuration with the basic functions in place:
11.3.2.1. Start-Up
Under , define whether the DNS server should be started when the booting the system or manually. To start the DNS server immediately, click . To stop the DNS server, click . To save the current settings, select . You can open the DNS port in the firewall with and modify the firewall settings with .
By selecting , the zone files are managed by an LDAP database. Any changes to zone data written to the LDAP database are picked up by the DNS server as soon as it is restarted or prompted to reload its configuration.
11.3.2.2. Forwarders
If your local DNS server cannot answer a request, it tries to forward the request to a , if configured so. This forwarder may be added manually to the . If the forwarder is not static like in dial-up connections, handles the configuration. For more information about netconfig, see man 8 netconfig.
11.3.2.3. Basic Options
In this section, set basic server options. From the menu, select the desired item then specify the value in the corresponding entry field. Include the new entry by selecting .
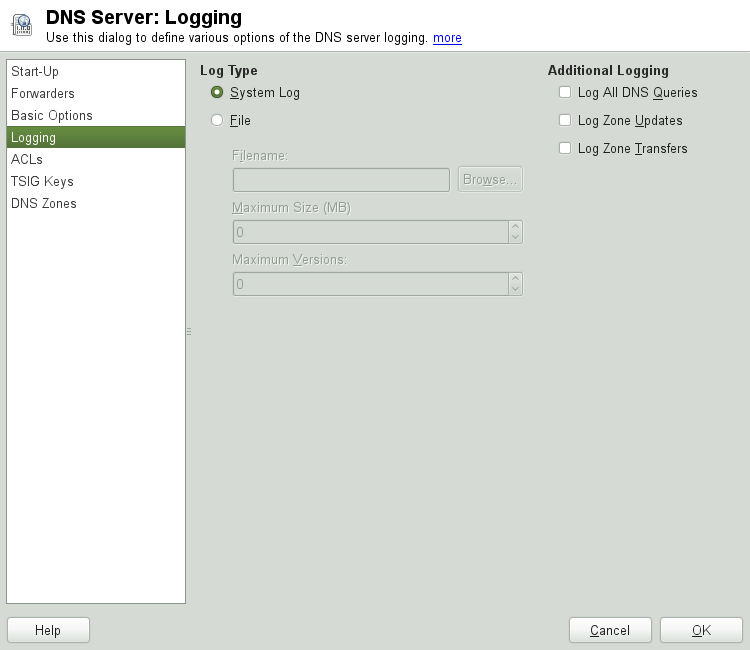
11.3.2.4. Logging
To set what the DNS server should log and how, select
. Under , specify
where the DNS server should write the log data. Use the systemwide log
file /var/log/messages by selecting
or specify a different file by selecting
. In the latter case, additionally specify a
name, the maximum file size in megabytes and the number of logfile
versions to store.
Further options are available under . Enabling causes every query to be logged, in which case the log file could grow extremely large. For this reason, it is not a good idea to enable this option for other than debugging purposes. To log the data traffic during zone updates between DHCP and DNS server, enable . To log the data traffic during a zone transfer from master to slave, enable . See Рисунок 11.4, «DNS Server: Logging».
11.3.2.5. ACLs
Use this dialog to define ACLs (access control lists) to enforce access restrictions. After providing a distinct name under , specify an IP address (with or without netmask) under in the following fashion:
{ 192.168.1/24; }The syntax of the configuration file requires that the address ends with a semicolon and is put into curly braces.
11.3.2.6. TSIG Keys
The main purpose of TSIGs (transaction signatures) is to secure communications between DHCP and DNS servers. They are described in Раздел 11.8, «Secure Transactions».
To generate a TSIG key, enter a distinctive name in the field labeled and specify the file where the key should be stored (). Confirm your choices with .
To use a previously created key, leave the field blank and select the file where it is stored under . After that, confirm with .
11.3.2.7. DNS Zones (Adding a Slave Zone)
To add a slave zone, select , choose the zone type , write the name of the new zone, and click .
In the sub-dialog under , specify the master from which the slave should pull its data. To limit access to the server, select one of the ACLs from the list.
11.3.2.8. DNS Zones (Adding a Master Zone)
To add a master zone, select , choose the
zone type , write the name of the new zone,
and click . When adding a master zone, a reverse
zone is also needed. For example, when adding the zone
example.com that points to hosts in a subnet
192.168.1.0/24, you should also add a reverse zone
for the IP-address range covered. By definition, this should be named
1.168.192.in-addr.arpa.
11.3.2.9. DNS Zones (Editing a Master Zone)
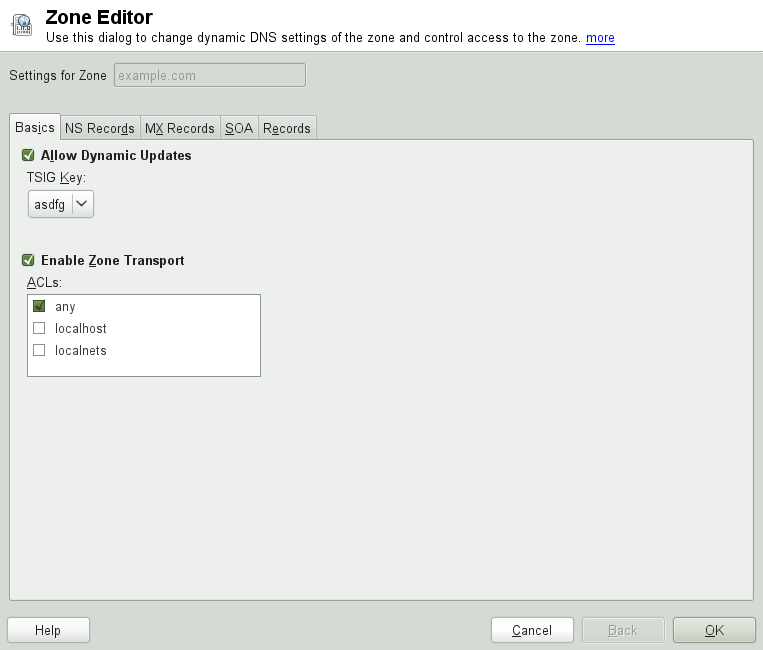
To edit a master zone, select , select the master zone from the table, and click . The dialog consists of several pages: (the one opened first), , , , and .
The basic dialog, shown in Рисунок 11.5, «DNS Server: Zone Editor (Basics)», lets you define settings for dynamic DNS and access options for zone transfers to clients and slave name servers. To permit the dynamic updating of zones, select as well as the corresponding TSIG key. The key must have been defined before the update action starts. To enable zone transfers, select the corresponding ACLs. ACLs must have been defined already.
In the dialog, select whether to enable zone transfers. Use the listed ACLs to define who can download zones.
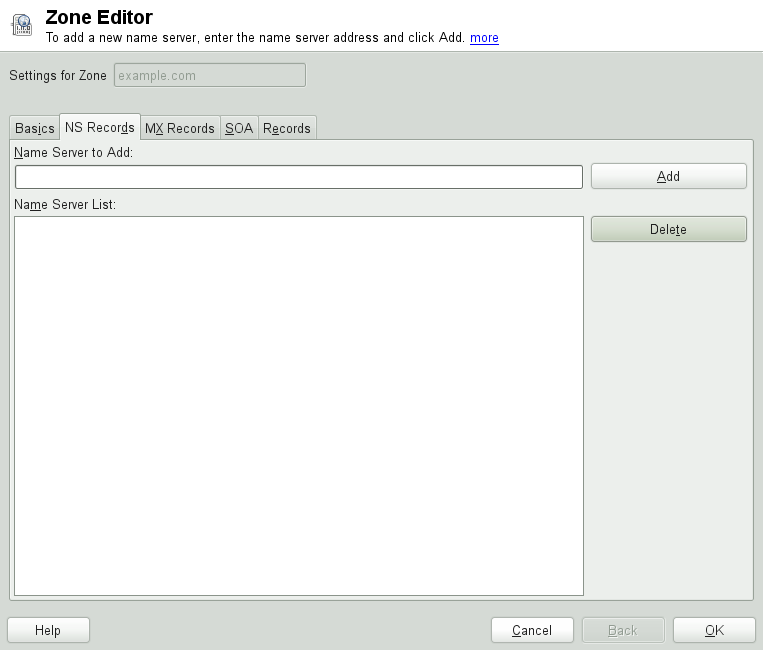
- Zone Editor (NS Records)
The dialog allows you to define alternative name servers for the zones specified. Make sure that your own name server is included in the list. To add a record, enter its name under then confirm with . See Рисунок 11.6, «DNS Server: Zone Editor (NS Records)».
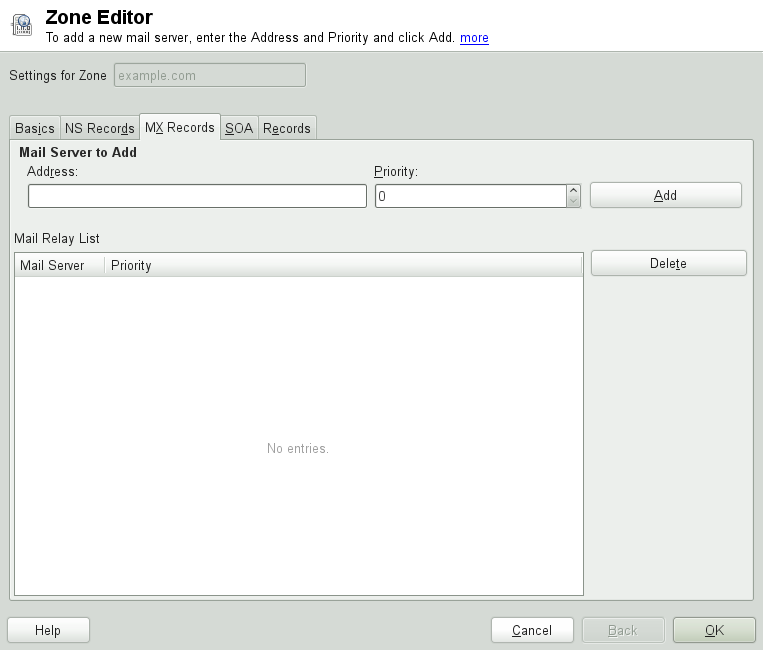
- Zone Editor (MX Records)
To add a mail server for the current zone to the existing list, enter the corresponding address and priority value. After doing so, confirm by selecting . See Рисунок 11.7, «DNS Server: Zone Editor (MX Records)».
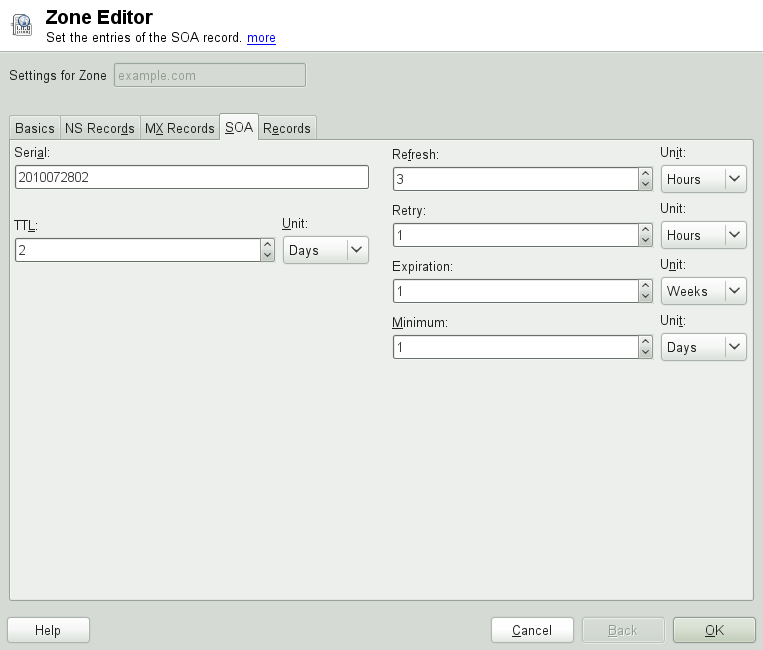
- Zone Editor (SOA)
This page allows you to create SOA (start of authority) records. For an explanation of the individual options, refer to Пример 11.6, «The /var/lib/named/example.com.zone File».
- Zone Editor (Records)
This dialog manages name resolution. In , enter the hostname then select its type. represents the main entry. The value for this should be an IP address. is an alias. Use the types and for detailed or partial records that expand on the information provided in the and tabs. These three types resolve to an existing A record. is for reverse zones. It is the opposite of an
Arecord, for example:hostname.example.com. IN A 192.168.0.1 1.0.168.192.in-addr.arpa IN PTR hostname.example.com.
![[Note]](admon/note.png) | Editing the Reverse Zone |
|---|---|
After adding a forward zone, go back to the main menu and select the reverse zone for editing. There in the tab activate the checkbox and select your forward zone. That way, all changes to the forward zone are automatically updated in the reverse zone. | |
11.4. Starting the BIND Name Server
On a openSUSE® system, the name server BIND (Berkeley
Internet Name Domain) comes preconfigured so it can be started
right after installation without any problems. If you already have a
functioning Internet connection and have entered
127.0.0.1 as the name
server address for localhost
in /etc/resolv.conf, you normally already have a
working name resolution without needing to know the DNS of the provider.
BIND carries out name resolution via the root name server, a notably
slower process. Normally, the DNS of the provider should be entered with
its IP address in the configuration file
/etc/named.conf under
forwarders to ensure effective and secure name
resolution. If this works so far, the name server runs as a pure
caching-only name server. Only when you configure
its own zones it becomes a proper DNS. Find a simple example documented
in /usr/share/doc/packages/bind/config.
![[Tip]](admon/tip.png) | Automatic Adaptation of the Name Server Information |
|---|---|
Depending on the type of Internet connection or the network connection,
the name server information can automatically be adapted to the current
conditions. To do this, set the
| |
However, do not set up an official domain until one is assigned to you by the responsible institution. Even if you have your own domain and it is managed by the provider, you are better off not using it, because BIND would otherwise not forward requests for this domain. The Web server at the provider, for example, would not be accessible for this domain.
To start the name server, enter the command
rcnamed start as
root. If «done»
appears to the right in green then named (as the name server process is
called) has been started successfully. Test the name server immediately
on the local system with the host or
dig programs, which should return
localhost as the default
server with the address
127.0.0.1. If this is not the
case, /etc/resolv.conf probably contains an
incorrect name server entry or the file does not exist at all. For the
first test, enter
host 127.0.0.1, which should
always work. If you get an error message, use
rcnamed status to see whether
the server is actually running. If the name server does not start or
behaves unexpectedly, you can usually find the cause in the log file
/var/log/messages.
To use the name server of the provider (or one already running on your
network) as the forwarder, enter the corresponding IP address or
addresses in the options section under
forwarders. The addresses included in
Пример 11.1, «Forwarding Options in named.conf» are just examples. Adjust these entries to
your own setup.
Пример 11.1. Forwarding Options in named.conf
options {
        directory "/var/lib/named";
        forwarders { 10.11.12.13; 10.11.12.14; };
        listen-on { 127.0.0.1; 192.168.1.116; };
        allow-query { 127/8; 192.168/16 };
        notify no;
        };
The options entry is followed by entries for the
zone, localhost, and
0.0.127.in-addr.arpa. The type
hint entry under «.» should always be present. The
corresponding files do not need to be modified and should work as they
are. Also make sure that each entry is closed with a «;» and
that the curly braces are in the correct places. After changing the
configuration file /etc/named.conf or the zone
files, tell BIND to reread them with
rcnamed reload. Achieve the same
by stopping and restarting the name server with
rcnamed restart. Stop the server
at any time by entering
rcnamed stop.
11.5. The /etc/named.conf Configuration File
All the settings for the BIND name server itself are stored in the
/etc/named.conf file. However, the zone data for the
domains to handle (consisting of the hostnames, IP addresses, and so on)
are stored in separate files in the /var/lib/named
directory. The details of this are described later.
/etc/named.conf is roughly divided into two areas.
One is the options section for general settings
and the other consists of zone entries for the
individual domains. A logging section and
acl (access control list) entries are optional.
Comment lines begin with a # sign or
//. A minimal /etc/named.conf is
shown in Пример 11.2, «A Basic /etc/named.conf».
Пример 11.2. A Basic /etc/named.conf
options {
directory "/var/lib/named";
forwarders { 10.0.0.1; };
notify no;
};
zone "localhost" in {
type master;
file "localhost.zone";
};
zone "0.0.127.in-addr.arpa" in {
type master;
file "127.0.0.zone";
};
zone "." in {
type hint;
file "root.hint";
};11.5.1. Important Configuration Options
- directory "
filename"; Specifies the directory in which BIND can find the files containing the zone data. Usually, this is
/var/lib/named.- forwarders {
ip-address; }; Specifies the name servers (mostly of the provider) to which DNS requests should be forwarded if they cannot be resolved directly. Replace
ip-addresswith an IP address like192.168.1.116.- forward first;
Causes DNS requests to be forwarded before an attempt is made to resolve them via the root name servers. Instead of
forward first,forward onlycan be written to have all requests forwarded and none sent to the root name servers. This makes sense for firewall configurations.- listen-on port 53 { 127.0.0.1;
ip-address; }; Tells BIND on which network interfaces and port to accept client queries.
port 53does not need to be specified explicitly, because53is the default port. Enter127.0.0.1to permit requests from the local host. If you omit this entry entirely, all interfaces are used by default.- listen-on-v6 port 53 {any; };
Tells BIND on which port it should listen for IPv6 client requests. The only alternative to
anyisnone. As far as IPv6 is concerned, the server only accepts wild card addresses.- query-source address * port 53;
This entry is necessary if a firewall is blocking outgoing DNS requests. This tells BIND to post requests externally from port 53 and not from any of the high ports above 1024.
- query-source-v6 address * port 53;
Tells BIND which port to use for IPv6 queries.
- allow-query { 127.0.0.1;
net; }; Defines the networks from which clients can post DNS requests. Replace
netwith address information like192.168.2.0/24. The/24at the end is an abbreviated expression for the netmask (in this case255.255.255.0).- allow-transfer ! *;;
Controls which hosts can request zone transfers. In the example, such requests are completely denied with
! *. Without this entry, zone transfers can be requested from anywhere without restrictions.- statistics-interval 0;
In the absence of this entry, BIND generates several lines of statistical information per hour in
/var/log/messages. Set it to 0 to suppress these statistics completely or set an interval in minutes.- cleaning-interval 720;
This option defines at which time intervals BIND clears its cache. This triggers an entry in
/var/log/messageseach time it occurs. The time specification is in minutes. The default is 60 minutes.- interface-interval 0;
BIND regularly searches the network interfaces for new or nonexistent interfaces. If this value is set to
0, this is not done and BIND only listens at the interfaces detected at start-up. Otherwise, the interval can be defined in minutes. The default is sixty minutes.- notify no;
noprevents other name servers from being informed when changes are made to the zone data or when the name server is restarted.
For a list of available options, read the manual page man 5 named.conf.
11.5.2. Logging
What, how, and where logging takes place can be extensively configured in BIND. Normally, the default settings should be sufficient. Пример 11.3, «Entry to Disable Logging», shows the simplest form of such an entry and completely suppresses any logging.
11.5.3. Zone Entries
Пример 11.4. Zone Entry for example.com
zone "example.com" in {
      type master;
      file "example.com.zone";
      notify no;
};
After zone, specify the name of the domain to
administer (example.com)
followed by in and a block of relevant options
enclosed in curly braces, as shown in Пример 11.4, «Zone Entry for example.com».
To define a slave zone, switch the
type to slave and specify a
name server that administers this zone as master
(which, in turn, may be a slave of another master), as shown in
Пример 11.5, «Zone Entry for example.net».
Пример 11.5. Zone Entry for example.net
zone "example.net" in {
      type slave;
      file "slave/example.net.zone";
      masters { 10.0.0.1; };
};
The zone options:
- type master;
By specifying
master, tell BIND that the zone is handled by the local name server. This assumes that a zone file has been created in the correct format.- type slave;
This zone is transferred from another name server. It must be used together with
masters.- type hint;
The zone
.of thehinttype is used to set the root name servers. This zone definition can be left as is.- file
example.com.zoneor file «slave/example.net.zone»; This entry specifies the file where zone data for the domain is located. This file is not required for a slave, because this data is pulled from another name server. To differentiate master and slave files, use the directory
slavefor the slave files.- masters {
server-ip-address; }; This entry is only needed for slave zones. It specifies from which name server the zone file should be transferred.
- allow-update {! *; };
This option controls external write access, which would allow clients to make a DNS entry—something not normally desirable for security reasons. Without this entry, zone updates are not allowed at all. The above entry achieves the same because
! *effectively bans any such activity.
11.6. Zone Files
Two types of zone files are needed. One assigns IP addresses to hostnames and the other does the reverse: it supplies a hostname for an IP address.
| Using the Dot (Period, Fullstop) in Zone Files |
|---|---|
The | |
The first case to consider is the zone file
example.com.zone, responsible for the domain
example.com, shown in
Пример 11.6, «The /var/lib/named/example.com.zone File».
Пример 11.6. The /var/lib/named/example.com.zone File
1.  $TTL 2D
2.  example.com. IN SOA      dns  root.example.com. (
3.               2003072441  ; serial
4.               1D          ; refresh
5.               2H          ; retry
6.               1W          ; expiry
7.               2D )        ; minimum
8.
9.               IN NS       dns
10.              IN MX       10 mail
11.
12. gate         IN A        192.168.5.1
13.              IN A        10.0.0.1
14. dns          IN A        192.168.1.116
15. mail         IN A        192.168.3.108
16. jupiter      IN A        192.168.2.100
17. venus        IN A        192.168.2.101
18. saturn       IN A        192.168.2.102
19. mercury      IN A        192.168.2.103
20. ntp          IN CNAME    dns
21. dns6         IN A6  0    2002:c0a8:174::
- Line 1:
$TTLdefines the default time to live that should apply to all the entries in this file. In this example, entries are valid for a period of two days (2 D).- Line 2:
This is where the SOA (start of authority) control record begins:
The name of the domain to administer is
example.comin the first position. This ends with".", because otherwise the zone would be appended a second time. Alternatively,@can be entered here, in which case the zone would be extracted from the corresponding entry in/etc/named.conf.After
IN SOAis the name of the name server in charge as master for this zone. The name is expanded fromdnstodns.example.com, because it does not end with a".".An e-mail address of the person in charge of this name server follows. Because the
@sign already has a special meaning,"."is entered here instead. Forroot@example.comthe entry must readroot.example.com.. The"."must be included at the end to prevent the zone from being added.The
(includes all lines up to)into the SOA record.
- Line 3:
The
serial numberis an arbitrary number that is increased each time this file is changed. It is needed to inform the secondary name servers (slave servers) of changes. For this, a 10 digit number of the date and run number, written as YYYYMMDDNN, has become the customary format.- Line 4:
The
refresh ratespecifies the time interval at which the secondary name servers verify the zoneserial number. In this case, one day.- Line 5:
The
retry ratespecifies the time interval at which a secondary name server, in case of error, attempts to contact the primary server again. Here, two hours.- Line 6:
The
expiration timespecifies the time frame after which a secondary name server discards the cached data if it has not regained contact to the primary server. Here, a week.- Line 7:
The last entry in the SOA record specifies the
negative
      caching TTL
—the time for which results of unresolved DNS queries from other servers may be cached.- Line 9:
The
IN NSspecifies the name server responsible for this domain.dnsis extended todns.example.combecause it does not end with a".". There can be several lines like this—one for the primary and one for each secondary name server. Ifnotifyis not set tonoin/etc/named.conf, all the name servers listed here are informed of the changes made to the zone data.- Line 10:
The MX record specifies the mail server that accepts, processes, and forwards e-mails for the domain
example.com. In this example, this is the hostmail.example.com. The number in front of the hostname is the preference value. If there are multiple MX entries, the mail server with the smallest value is taken first and, if mail delivery to this server fails, an attempt is made with the next higher value.- Lines 12–19:
These are the actual address records where one or more IP addresses are assigned to hostnames. The names are listed here without a
"."because they do not include their domain, soexample.comis added to all of them. Two IP addresses are assigned to the hostgate, as it has two network cards. Wherever the host address is a traditional one (IPv4), the record is marked withA. If the address is an IPv6 address, the entry is marked withAAAA.IPv6 Syntax The IPv6 record has a slightly different syntax than IPv4. Because of the fragmentation possibility, it is necessary to provide information about missed bits before the address. To just fill up the IPv6 address with the needed number of «0», add two colons at the correct place in the address.
pluto     AAAA 2345:00C1:CA11::1234:5678:9ABC:DEF0
pluto     AAAA 2345:00D2:DA11::1234:5678:9ABC:DEF0
- Line 20:
The alias
ntpcan be used to addressdns(CNAMEmeans canonical name).
The pseudodomain in-addr.arpa is used for the reverse
lookup of IP addresses into hostnames. It is appended to the network part
of the address in reverse notation. So
192.168 is resolved into
168.192.in-addr.arpa. See
Пример 11.7, «Reverse Lookup».
Пример 11.7. Reverse Lookup
1.  $TTL 2D
2.  168.192.in-addr.arpa.   IN SOA dns.example.com. root.example.com. (
3.                          2003072441      ; serial
4.                          1D              ; refresh
5.                          2H              ; retry
6.                          1W              ; expiry
7.                          2D )            ; minimum
8.
9.                          IN NS           dns.example.com.
10.
11. 1.5                     IN PTR          gate.example.com.
12. 100.3                   IN PTR          www.example.com.
13. 253.2                   IN PTR          cups.example.com.
- Line 1:
$TTL defines the standard TTL that applies to all entries here.
- Line 2:
The configuration file should activate reverse lookup for the network
192.168. Given that the zone is called168.192.in-addr.arpa, it should not be added to the hostnames. Therefore, all hostnames are entered in their complete form—with their domain and with a"."at the end. The remaining entries correspond to those described for the previousexample.comexample.- Lines 3–7:
See the previous example for
example.com.- Line 9:
Again this line specifies the name server responsible for this zone. This time, however, the name is entered in its complete form with the domain and a
"."at the end.- Lines 11–13:
These are the pointer records hinting at the IP addresses on the respective hosts. Only the last part of the IP address is entered at the beginning of the line, without the
"."at the end. Appending the zone to this (without the.in-addr.arpa) results in the complete IP address in reverse order.
Normally, zone transfers between different versions of BIND should be possible without any problems.
11.7. Dynamic Update of Zone Data
The term dynamic update refers to operations by
which entries in the zone files of a master server are added, changed, or
deleted. This mechanism is described in RFC 2136. Dynamic update is
configured individually for each zone entry by adding an optional
allow-update or
update-policy rule. Zones to update dynamically
should not be edited by hand.
Transmit the entries to update to the server with the command
nsupdate. For the exact syntax of this command, check
the manual page for nsupdate (man 8
nsupdate). For security reasons, any such update should be
performed using TSIG keys as described in Раздел 11.8, «Secure Transactions».
11.8. Secure Transactions
Secure transactions can be made with the help of transaction signatures (TSIGs) based on shared secret keys (also called TSIG keys). This section describes how to generate and use such keys.
Secure transactions are needed for communication between different servers and for the dynamic update of zone data. Making the access control dependent on keys is much more secure than merely relying on IP addresses.
Generate a TSIG key with the following command (for details, see
man dnssec-keygen):
dnssec-keygen -a hmac-md5 -b 128 -n HOST host1-host2
This creates two files with names similar to these:
Khost1-host2.+157+34265.private Khost1-host2.+157+34265.key
The key itself (a string like
ejIkuCyyGJwwuN3xAteKgg==) is found in both files. To
use it for transactions, the second file
(Khost1-host2.+157+34265.key) must be transferred to
the remote host, preferably in a secure way (using scp, for example). On
the remote server, the key must be included in the
/etc/named.conf file to enable a secure
communication between host1 and
host2:
key host1-host2 {
 algorithm hmac-md5;
 secret "ejIkuCyyGJwwuN3xAteKgg==";
};![[Warning]](admon/warning.png) | File Permissions of /etc/named.conf |
|---|---|
Make sure that the permissions of include "filename"
Replace | |
To enable the server host1 to use the key for
host2 (which has the address
10.1.2.3 in this example), the server's
/etc/named.conf must include the following rule:
server 10.1.2.3 {
  keys { host1-host2. ;};
};
Analogous entries must be included in the configuration files of
host2.
Add TSIG keys for any ACLs (access control lists, not to be confused with file system ACLs) that are defined for IP addresses and address ranges to enable transaction security. The corresponding entry could look like this:
allow-update { key host1-host2. ;};
This topic is discussed in more detail in the BIND
Administrator Reference Manual under
update-policy.
11.9. DNS Security
DNSSEC, or DNS security, is described in RFC 2535. The tools available for DNSSEC are discussed in the BIND Manual.
A zone considered secure must have one or several zone keys associated
with it. These are generated with dnssec-keygen, just
like the host keys. The DSA encryption algorithm is currently used to
generate these keys. The public keys generated should be included in the
corresponding zone file with an $INCLUDE rule.
With the command dnssec-signzone, you can create sets
of generated keys (keyset- files), transfer them to
the parent zone in a secure manner, and sign them. This generates the
files to include for each zone in /etc/named.conf.
11.10. For More Information
For additional information, refer to the BIND Administrator
Reference Manual from package
bind-doc, which is installed
under /usr/share/doc/packages/bind/. Consider
additionally consulting the RFCs referenced by the manual and the manual
pages included with BIND.
/usr/share/doc/packages/bind/README.SuSE contains
up-to-date information about BIND in openSUSE.