Глава 4. LDAP — Сервис директорий
Содержание
- 4.1. LDAP против NIS
- 4.2. Структура дерева каталога LDAP
- 4.3. Configuring an LDAP Server with YaST
- 4.4. Configuring an LDAP Client with YaST
- 4.5. Configuring LDAP Users and Groups in YaST
- 4.6. Browsing the LDAP Directory Tree
- 4.7. Manually Configuring an LDAP Server
- 4.8. Управление данными в каталоге LDAP
- 4.9. For More Information
Аннотация
Облегченный протокол доступа к каталогам (LDAP) — это набор протоколов, созданный для доступа и поддержания информационных каталогов. LDAP может использоваться для различных целей, например, управление пользователями и группами, управление системной конфигурацией или управление адресами. В этом разделе дается краткое описание как работает OpenLDAP и как управлять данными LDAP с помощью YaST.
В сетевом окружении важно сохранить ценную информацию структурированной и быстро доступной. Это может быть сделано с помощью такого сервиса каталогов, как общие желтые страницы, хранящие информацию доступной в отлично структурированной форме, приспособленной для быстрого поиска.
В идеальном случае, центральный сервер хранит данные в каталоге и распределяет их всем клиентам по определенному протоколу. Данные структурированы в таком виде, который позволяет широкому кругу приложений получить доступ к ним. Таким образом, отпадает необходимость в хранении клиентом каждого календаря или базы электронной почты - вместо этого будет доступен центральный репозиторий. Использование открытого и стандартизированного протокола, как LDAP, гарантирует возможность получения доступа к информации для различных приложений.
Каталог в этом контексте — это тип базы данных, оптимизированного на чтения и поиск:
Делает возможным множественный доступ для чтения, доступ на запись ограничен небольшим числом модификаций, сделанных администратором. Обычные базы данных оптимизированы для доступа к большому объему возможных данных за короткий промежуток времени.
Поскольку доступ на запись может быть выполнен в ограниченном виде, сервис каталогов используется по большей части для администрирования неизменяемой, статической информации. При работе с часто меняющимися данными, особенно с такими наборами данных, как, например, банковские счета, согласованность данных имеет первостепенное значение. Если сумма должна быть вычтена из одного счета для добавления к другому, то такие операции должны происходить одновременно, в течение одной транзакции, чтобы гарантировать корректность полученных данных. Традиционные реляционные базы данных обычно имеют очень сильный акцент на целостности данных, такой как поддержка ссылочной целостности транзакций. С другой стороны, краткосрочные несоответствия, как правило, приемлемы для LDAP. Так, часто нет необходимости в таких жестких требований к согласованности данных.
Дизайн сервиса каталогов, как LDAP, не подразумевает поддержки сложных модификаций и механизмов запросов. Все приложения, обращающиеся к этому сервису, должны получать доступ к нужным данным легко и быстро.
4.1. LDAP против NIS
Администраторы Unix-систем традиционно используют сервис NIS (Network Information
Service, Информационная служба сети) для разрешения имен и предоставления данных
по сети. Данные конфигурации содержатся в файлах group,
hosts, mail,
netgroup, networks,
passwd, printcap,
protocols, rpc и
services в каталоге /etc, которые
предоставляются всем пользователям в сети. Эти файлы могут поддерживаться без
особых усилий, так как они состоят из простого текста. Обработка большого
количества данных, однако, становится все более и более сложной из-за отсутствия
структурирования. NIS разрабатывался для Unix платформ и, потому, не очень
подходит для централизованного управления в гетерогенных сетях.
В отличие от NIS, сервис LDAP не ограничен только сетями UNIX. Серверы Windows (начиная с 2000) поддерживают LDAP, как сервис каталогов. Прикладные задачи, описанные выше, дополнительно поддерживаются в не-Unix сетях.
Принцип LDAP может быть применен к структуре любых данных, которая может централизованно администрироваться. Примеры нескольких приложений:
Применение в качестве замены сервиса NIS
Перенаправление почты (postfix, sendmail)
Адресные книги для таких почтовых клиентов, как Mozilla, Evolution и Outlook
Администрирование зоны, написанной для сервера имен Bind9
Аутентификация пользователей совместно с Samba в гетерогенных сетях
Этот список может быть расширен, поскольку LDAP более гибкая вещь, чем NIS. Ясная иерархическая структура облегчает администрирование большого количества данных, так как они могут быть найдены значительно проще.
4.2. Структура дерева каталога LDAP
Для лучшего понимания, как работает LDAP и как хранятся данные, очень важно понимать, каким образом данные организованы на сервере и как эта структура позволяет обеспечить быстрый доступ к необходимым данным. Для успешной установки LDAP необходимо ознакомиться с используемой терминологией. Эта секция позволяет понять основной вывод дерева и описывает терминологию в контексте LDAP. Эту секцию можно пропустить, если вы уже имеете некоторое представление о работе LDAP и просто хотите научиться установке LDAP-окружения в openSUSE. Прочитайте Раздел 4.3, «Configuring an LDAP Server with YaST» или Раздел 4.7, «Manually Configuring an LDAP Server».
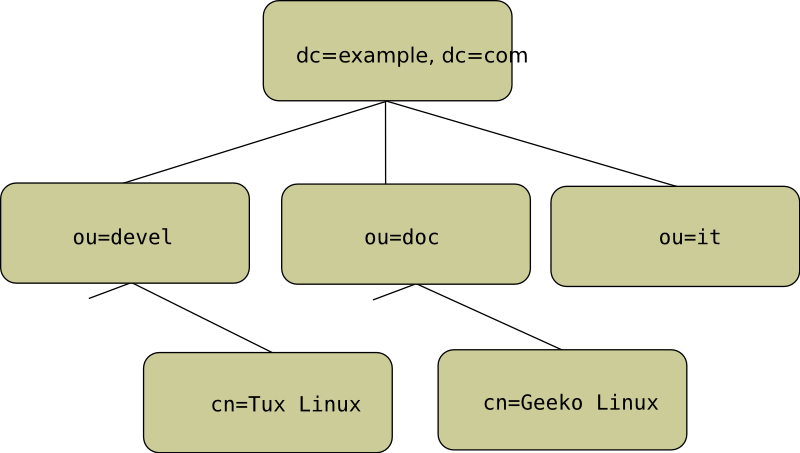
Каталог LDAP имеет структуру дерева. Все записи (называемые объектами) каталога имеют определенную позицию в этой иерархии. Эта иерархия называется Информационным деревом справочника (DIT, Directory Information Tree). Полный путь к необходимой записи, который однозначно идентифицирует ее, называется характерное имя (distinguished name) или DN. Единый узел вдоль пути к этой записи называется (relative distinguished name) или RDN.
Отношения элементов в пределах дерева LDAP хорошо видны на рисунке Рисунок 4.1, «Структура каталога LDAP».
Полная диаграмма является вымышленным информационным деревом каталога.
Изображены записи на третьем уровне. Каждая запись соответствует одному
прямоугольнику на картинке. Полное distinguished name
для вымышленного пользователя Geeko Linux
будет, в данном случае, cn=Geeko Linux,ou=doc,dc=example,dc=com.
Оно создается путем добавления RDN cn=Geeko Linux к DN
предыдущей записи ou=doc,dc=example,dc=com.
Типы объектов, которые хранятся в DIT, в общем случае определяются, следуя Схеме (Schema). Тип объекта определяется классом объекта (object class). Класс объекта определяет, какие свойства связанного объекта должны или могут быть назначены. Схема, в свою очередь, должна содержать определения всех классов объекта и свойства, использующиеся в нужном прикладном сценарии. Существует несколько общих схем (RFC 2252 и 2256). LDAP RFC определяют несколько наиболее часто используемых схем (см., например, RFC4519). Кроме того, существует много других схем (например, замена Samba, NIS и т.д.). При этом можно самому создавать схемы или использовать несколько дополняющих друг друга схем (если это требуется окружением, в котором будет эксплуатироваться LDAP-сервер).
В Таблица 4.1, «Общий блок используемых классов объектов и атрибутов» показан небольшой обзор классов объекта
из core.schema и inetorgperson.schema,
использующихся в примере, включая свойства и действительные значения свойств.
Таблица 4.1. Общий блок используемых классов объектов и атрибутов
|
Класс объекта |
Значение |
Пример записи |
Необходимые свойства |
|---|---|---|---|
|
dcObject |
domainComponent (именованные компоненты домена) |
example |
dc |
|
organizationalUnit |
organizationalUnit (организационная единица) |
doc |
ou |
|
inetOrgPerson |
inetOrgPerson (персональные данные) |
Geeko Linux |
sn and cn |
В Пример 4.1, «Выдержка из schema.core» показана часть из директивы схемы с объяснениями.
Пример 4.1. Выдержка из schema.core
attributetype (2.5.4.11 NAME ( 'ou' 'organizationalUnitName')DESC 'RFC2256: organizational unit this object belongs to'
SUP name )
... objectclass ( 2.5.6.5 NAME 'organizationalUnit'
DESC 'RFC2256: an organizational unit'
SUP top STRUCTURAL
MUST ou
MAY (userPassword $ searchGuide $ seeAlso $ businessCategory
$ x121Address $ registeredAddress $ destinationIndicator $ preferredDeliveryMethod $ telexNumber $ teletexTerminalIdentifier $ telephoneNumber $ internationaliSDNNumber $ facsimileTelephoneNumber $ street $ postOfficeBox $ postalCode $ postalAddress $ physicalDeliveryOfficeName $ st $ l $ description) ) ...
Тип свойства organizationalUnitName и переданный класс
объекта organizationalUnit в данном случае служат примером.
Имя свойства, его уникальный OID (идентификатор объекта, object identifier (цифровой)) и аббревиатура свойства. | |
Краткое описание свойства с помощью | |
| |
Описание класса объекта | |
Краткое описание класса объекта. | |
Запись | |
Начиная с | |
Начиная с |
Очень хорошим введением с описанием использования схем можно найти в документации к
openLDAP. После установки, она доступна в
/usr/share/doc/packages/openldap2/guide/admin/guide.html.
4.3. Configuring an LDAP Server with YaST
Use YaST to set up an LDAP server. Typical use cases for LDAP servers include the management of user account data and the configuration of mail, DNS, and DHCP servers.
To set up an LDAP server for user account data, make sure the
yast2-ldap-server and
openldap2 packages are installed. Then proceed
as follows:
Start YaST as
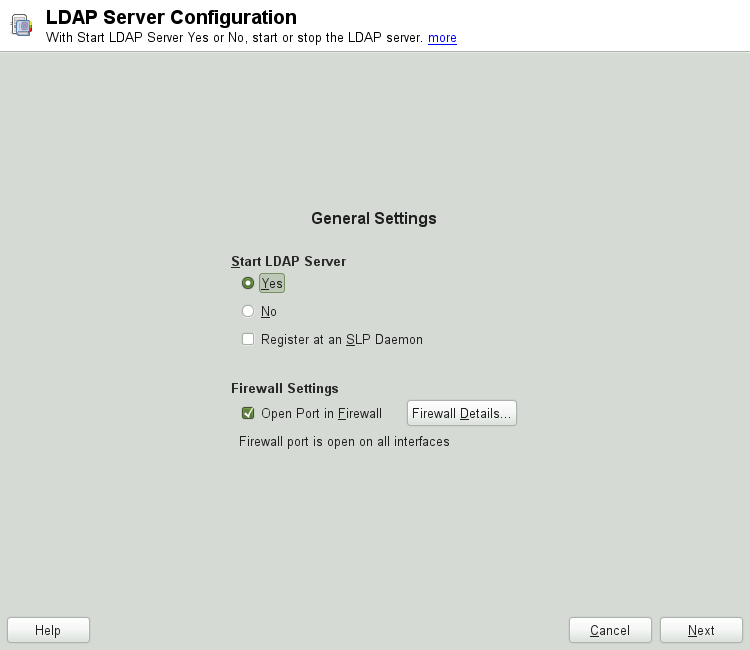
rootand select + to invoke the configuration wizard.Configure the of your LDAP server (you can change these settings later)—see Рисунок 4.2, «YaST LDAP Server Configuration»:
Set LDAP to be started.
If the LDAP server should announce its services via SLP, check .
Configure .
Click .
Select the server type: stand-alone server, master server in a replication setup, or replication (slave) server.
Select security options ().
It is strongly recommended to . For more information, see Шаг 4.
![[Warning]](admon/warning.png)
Password Encryption Enabling TLS ensures passwords are sent encrypted over the network. When this option is not enabled, passwords are sent unencrypted.
Also consider to use LDAP over SSL and certificates.
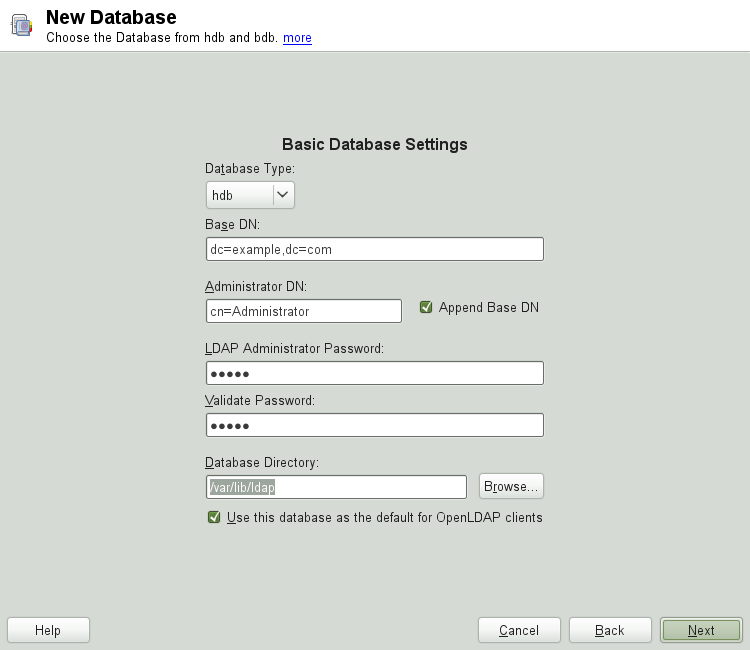
Confirm with entering an and then clicking —see Рисунок 4.2, «YaST LDAP Server Configuration».
Check the and click to exit the configuration wizard.
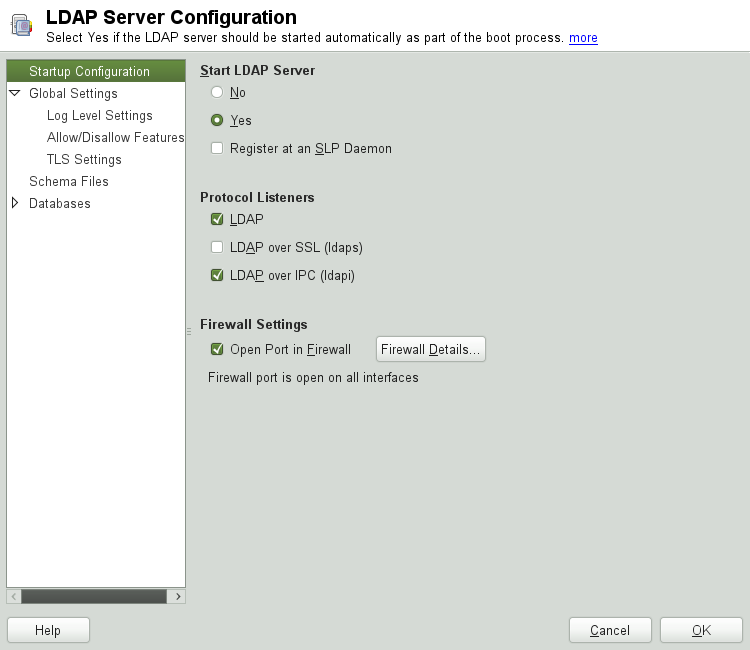
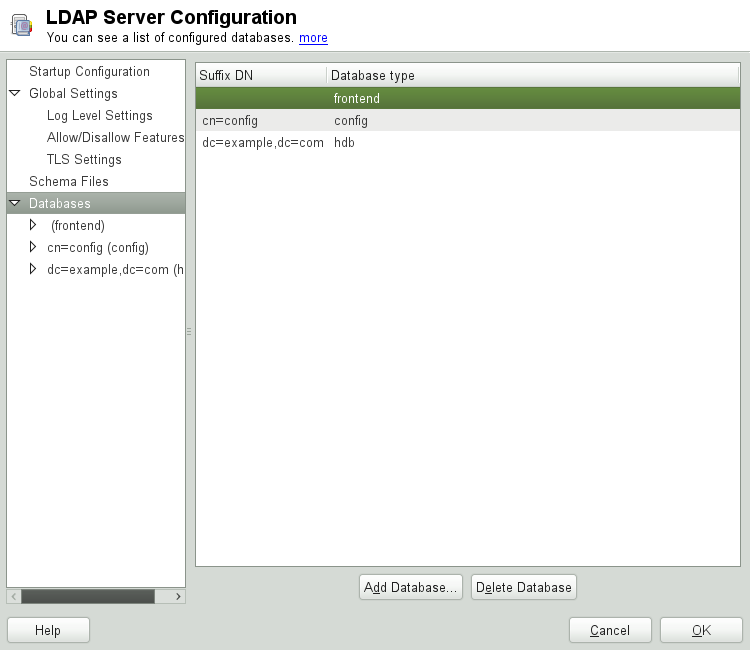
For changes or additional configuration start the LDAP server module again and in the left pane expand to make subentries visible—see Рисунок 4.4, «YaST LDAP Server Configuration»:
With , configure the degree of logging activity (verbosity) of the LDAP server. From the predefined list, select or deselect the logging options according to your needs. The more options are enabled, the larger your log files grow.
Configure which connection types the server should offer under . Choose from:
- LDAPv2 Bind Requests
This option enables connection requests (bind requests) from clients using the previous version of the protocol (LDAPv2).
- Anonymous Bind When Credentials Not Empty
Normally the LDAP server denies any authentication attempts with empty credentials (DN or password). Enabling this option, however, makes it possible to connect with a password and no DN to establish an anonymous connection.
- Unauthenticated Bind When DN Not Empty
Enabling this option makes it possible to connect without authentication (anonymously) using a DN but no password.
- Unauthenticated Update Options to Process
Enabling this option allows non-authenticated (anonymous) update operations. Access is restricted according to ACLs and other rules.
also lets you configure the server flags. Choose from:
- Disable Acceptance of Anonymous Bind Requests
The server will no longer accept anonymous bind requests. Note, that this does not generally prohibit anonymous directory access.
- Disable Simple Bind Authentication
Completely disable Simple Bind authentication.
- Disable Forcing Session to Anonymous Status upon StartTLS Operation Receipt
The server will no longer force an authenticated connection back to the anonymous state when receiving the StartTLS operation.
- Disallow the StartTLS Operation if Authenticated
The server will disallow the StartTLS operation on already authenticated connections.
To configure secure communication between client and server, proceed with :
Activate to enable TLS and SSL encryption of the client/server communication.
Either by specifying the exact path to its location or enable the . If the is not available because it has not been created during installation, go for first— for more information, see Раздел 15.2, «YaST Modules for CA Management».
Add Schema files to be included in the server's configuration by selecting in the left part of the dialog. The default selection of schema files applies to the server providing a source of YaST user account data.
YaST allows to add traditional Schema files (usually with a name ending
in .schema) or LDIF files containing Schema
definitions in OpenLDAP's LDIF Schema format.
To configure the databases managed by your LDAP server, proceed as follows:
Select the item in the left part of the dialog.
Click to add a new database.
Enter the requested data:
Enter the base DN of your LDAP server.
Enter the DN of the administrator in charge of the server. If you check , only provide the
cnof the administrator and the system fills in the rest automatically.- LDAP Administrator Password
Enter the password for the database administrator.
- Use This Database as the Default for OpenLDAP Clients
For convenience, check this option if wanted.
In the next dialog configure replication settings.
In the next dialog, enable enforcement of password policies to provide extra security to your LDAP server:
Check to be able to specify a password policy.
Activate to have clear text passwords be hashed before they are written to the database whenever they are added or modified.
provides a relevant error message for bind requests to locked accounts.
![[Warning]](admon/warning.png)
Locked Accounts in Security Sensitive Environments Do not use the option if your environment is sensitive to security issues, because the «Locked Account» error message provides security-sensitive information that can be exploited by a potential attacker.
Enter the DN of the default policy object. To use a DN other than the one suggested by YaST, enter your choice. Otherwise, accept the default settings.
Complete the database configuration by clicking .
If you have not opted for password policies, your server is ready to run at this point. If you have chosen to enable password policies, proceed with the configuration of the password policy in detail. If you have chosen a password policy object that does not yet exist, YaST creates one:
Enter the LDAP server password. In the navigation tree below expand your database object and activate the item.
Make sure is activated. Then click .
Configure the password change policies:
Determine the number of passwords stored in the password history. Saved passwords may not be reused by the user.
Determine if users will be able to change their passwords and if they will need to change their passwords after a reset by the administrator. Require the old password for password changes (optional).
Determine whether and to what extent passwords should be subject to quality checking. Set the minimum password length that must be met before a password is valid. If you select , users are allowed to use encrypted passwords, even though the quality checks cannot be performed. If you opt for only those passwords that pass the quality tests are accepted as valid.
Configure the password time-limit policies:
Determine the minimum password time-limit (the time that needs to pass between two valid password changes) and the maximum password time-limit.
Determine the time between a password expiration warning and the actual password expiration.
Set the number of postponement uses of an expired password before the password expires permanently.
Configure the lockout policies:
Enable password locking.
Determine the number of bind failures that trigger a password lock.
Determine the duration of the password lock.
Determine the length of time that password failures are kept in the cache before they are purged.
Apply your password policy settings with .
To edit a previously created database, select its base DN in the tree to the left. In the right part of the window, YaST displays a dialog similar to the one used for the creation of a new database (with the main difference that the base DN entry is grayed out and cannot be changed).
After leaving the LDAP server configuration by selecting , you are ready to go with a basic working configuration for your LDAP server. To fine-tune this setup, make use of OpenLDAP's dynamic configuration backend.
The OpenLDAP's dynamic configuration backend stores the configuration in
an LDAP database. That database consists of a set of
.ldif files in
/etc/openldap/slapd.d. There is no need to access
these files directly. To access the settings you can either use the
YaST LDAP server module (the yast2-ldap-server
package) or an LDAP client such as ldapmodify or
ldapsearch. For more information on the dynamic
configuration of OpenLDAP, see the OpenLDAP Administration Guide.
4.4. Configuring an LDAP Client with YaST
YaST includes a module to set up LDAP-based user management. If you did not enable this feature during the installation, start the module by selecting +. YaST automatically enables any PAM and NSS-related changes as required by LDAP and installs the necessary files. Simply connect your client to the server and let YaST manage users over LDAP. This basic setup is described in Раздел 4.4.1, «Configuring Basic Settings».
Use the YaST LDAP client to further configure the YaST group and user configuration modules. This includes manipulating the default settings for new users and groups and the number and nature of the attributes assigned to a user or group. LDAP user management allows you to assign far more and different attributes to users and groups than traditional user or group management solutions. This is described in Раздел 4.4.2, «Configuring the YaST Group and User Administration Modules».
4.4.1. Configuring Basic Settings
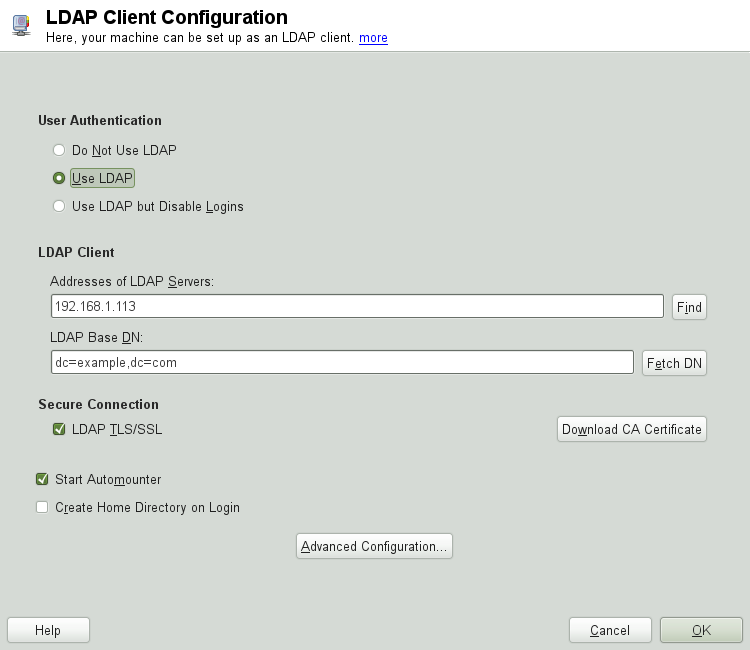
The basic LDAP client configuration dialog (Рисунок 4.6, «YaST: LDAP Client Configuration») opens during installation if you choose LDAP user management or when you select + in the YaST Control Center in the installed system.
To authenticate users of your machine against an OpenLDAP server and to enable user management via OpenLDAP, proceed as follows:
Click to enable the use of LDAP. Select instead if you want to use LDAP for authentication, but do not want other users to log in to this client.
Enter the IP address of the LDAP server to use.
Enter the to select the search base on the LDAP server. To retrieve the base DN automatically, click . YaST then checks for any LDAP database on the server address specified above. Choose the appropriate base DN from the search results given by YaST.
If TLS or SSL-protected communication with the server is required, select . Click to download a certificate in PEM format from a URL.
Select to mount remote directories on your client, such as a remotely managed
/home.Select to have a user's home automatically created on the first user login.
Click to apply your settings.
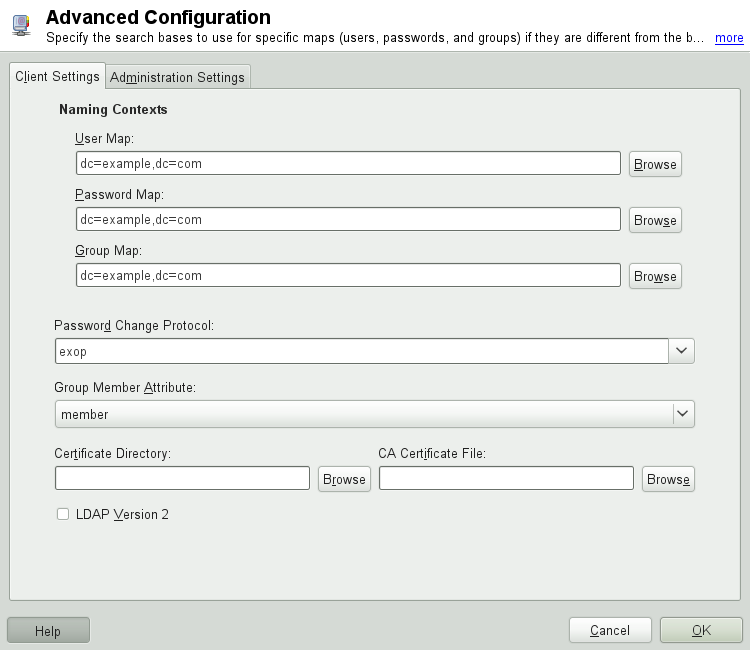
To modify data on the server as administrator, click . The following dialog is split into two tabs. See Рисунок 4.7, «YaST: Advanced Configuration».
In the tab, adjust the following settings according to your needs:
If the search base for users, passwords, and groups differs from the global search base specified in the , enter these different naming contexts in , , and .
Specify the password change protocol. The standard method to use whenever a password is changed is
crypt, meaning that password hashes generated by crypt are used. For details on this and other options, refer to thepam_ldapman page.Specify the LDAP group to use with . The default value for this is
member.If a secure connection requires certificate checking, specify where your in PEM format is located. Or specify a directory with certificates.
If the LDAP server still uses LDAPv2, enable the use of this protocol version by selecting .
In , adjust the following settings:
Set the base for storing your user management data via .
Enter the appropriate value for . This DN must be identical with the
rootdnvalue specified in/etc/openldap/slapd.confto enable this particular user to manipulate data stored on the LDAP server. Enter the full DN (such ascn=Administrator,dc=example,dc=com) or activate to have the base DN added automatically when you entercn=Administrator.Check to create the basic configuration objects on the server to enable user management via LDAP.
If your client machine needs to act as a file server for home directories across your network, check .
Use the section to select, add, delete, or modify the password policy settings to use. The configuration of password policies with YaST is part of the LDAP server setup.
Click to leave the , then to apply your settings.
Use to edit entries on the LDAP server. Access to the configuration modules on the server is then granted according to the ACLs and ACIs stored on the server. Follow the procedures outlined in Раздел 4.4.2, «Configuring the YaST Group and User Administration Modules».
4.4.2. Configuring the YaST Group and User Administration Modules
Use the YaST LDAP client to adapt the YaST modules for user and group administration and to extend them as needed. Define templates with default values for the individual attributes to simplify the data registration. The presets created here are stored as LDAP objects in the LDAP directory. The registration of user data is still done with the regular YaST modules for user and group management. The registered data is stored as LDAP objects on the server.
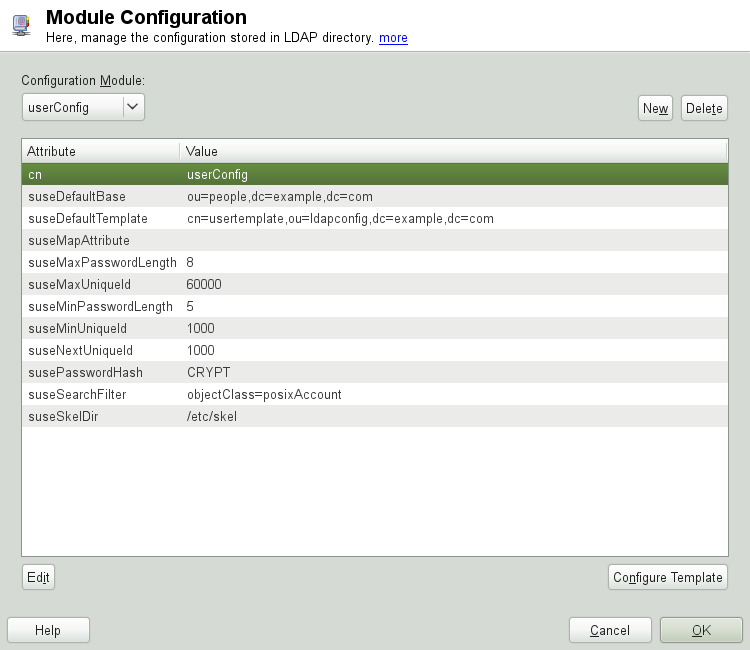
The dialog for module configuration (Рисунок 4.8, «YaST: Module Configuration») allows the creation of new modules, selection and modification of existing configuration modules, and design and modification of templates for such modules.
To create a new configuration module, proceed as follows:
In the click , then open the tab. Click and enter the LDAP server credentials.
Click and select the type of module to create. For a user configuration module, select
suseUserConfigurationand for a group configuration choosesuseGroupConfiguration.Choose a name for the new template (e.g.,
userConfig). The content view shows a table listing all attributes allowed in this module and their assigned values.Accept the preset values or adjust the defaults to use in group and user configurations by selecting the relevant attribute, pressing , and entering the new value. Rename a module by changing the
cnattribute of the module. Clicking deletes the currently selected module.After you click , the new module is added to the selection menu.
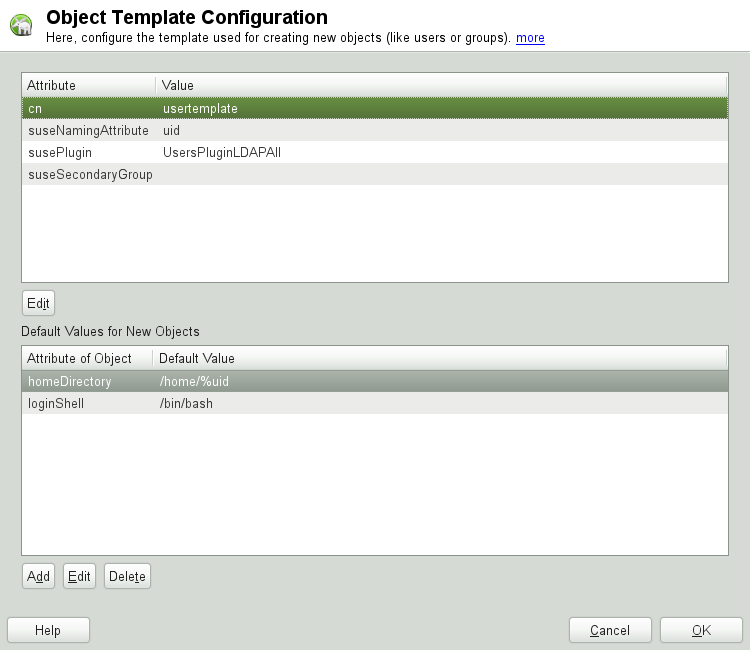
The YaST modules for group and user administration embed templates with standard values. To edit a template associated with a configuration module, start the object template configuration (Рисунок 4.9, «YaST: Configuration of an Object Template»):
In the dialog, click .
Determine the values of the general attributes assigned to this template according to your needs or leave them empty. Empty attributes are deleted on the LDAP server.
Modify, delete, or add new default values for new objects (user or group configuration objects in the LDAP tree).
Connect the template to its module by setting the
susedefaulttemplate attribute value of the module to
the DN of the adapted template.
![[Tip]](admon/tip.png) | |
The default values for an attribute can be created from other
attributes by using a variable instead of an absolute value. For
example, when creating a new user, | |
Once all modules and templates are configured correctly and ready to run, new groups and users can be registered in the usual way with YaST.
4.5. Configuring LDAP Users and Groups in YaST
The actual registration of user and group data differs only slightly from the procedure when not using LDAP. The following instructions relate to the administration of users. The procedure for administering groups is analogous.
Access the YaST user administration with +.
Use to limit the view of users to the LDAP users and enter the password for Root DN.
Click to enter the user configuration. A dialog with four tabs opens:
Specify username, login, and password in the tab.
Check the tab for the group membership, login shell, and home directory of the new user. If necessary, change the default to values that better suit your needs. The default values (as well as those of the password settings) can be defined with the procedure described in Раздел 4.4.2, «Configuring the YaST Group and User Administration Modules».
Modify or accept the default .
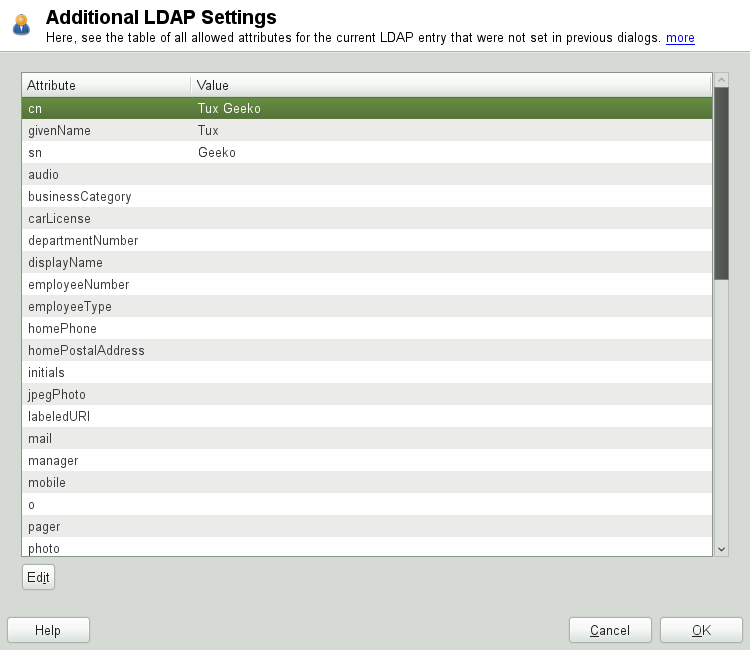
Enter the tab, select the LDAP plug-in, and click to configure additional LDAP attributes assigned to the new user (see Рисунок 4.10, «YaST: Additional LDAP Settings»).
Click to apply your settings and leave the user configuration.
The initial input form of user administration offers . This allows you to apply LDAP search filters to the set of available users. Alternatively open the module for configuring LDAP users and groups by selecting .
4.6. Browsing the LDAP Directory Tree
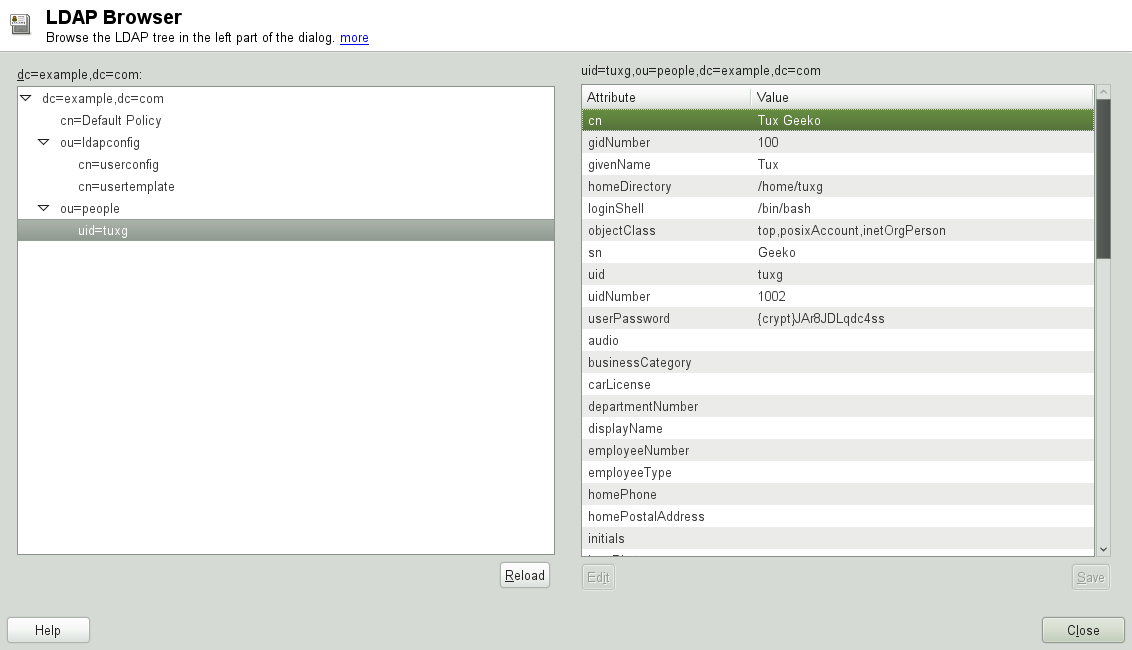
To conveniently browse the LDAP directory tree and all its entries, use the YaST LDAP Browser:
Log in as
root.Start ++.
Enter the address of the LDAP server, the Administrator DN, and the password for the Root DN of this server (if you need both to read and write the data stored on the server).
Alternatively, choose and do not provide the password to gain read access to the directory.
The tab displays the content of the LDAP directory to which your machine connected. Click to expand each item's submenu.
To view any entry in detail, select it in the view and open the tab.
All attributes and values associated with this entry are displayed.
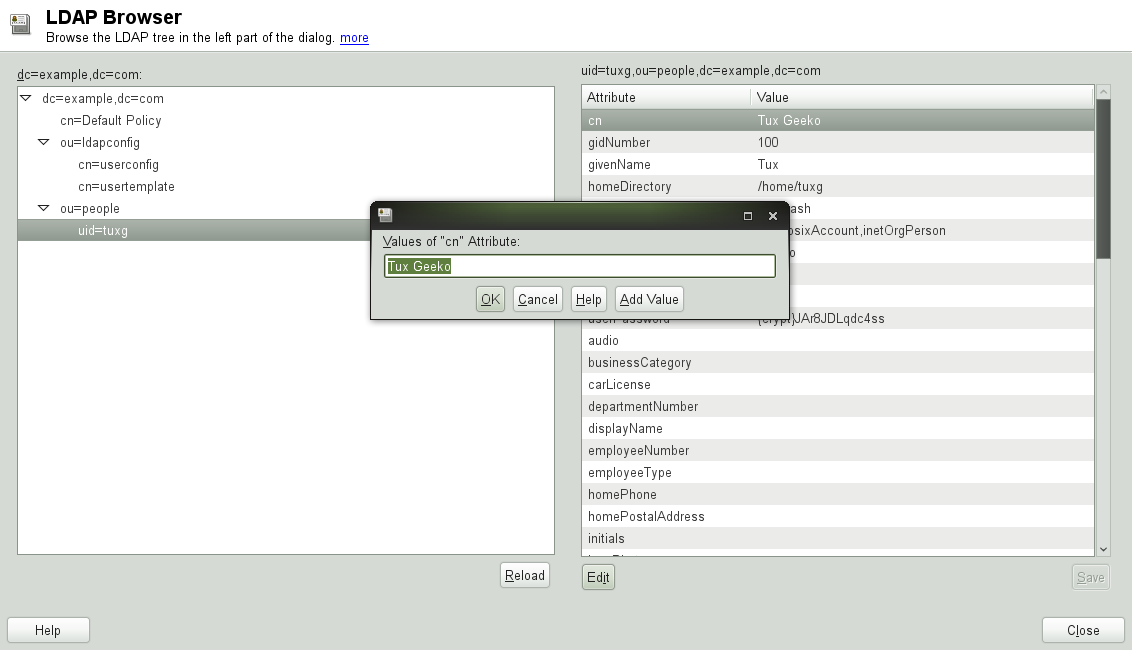
To change the value of any of these attributes, select the attribute, click , enter the new value, click , and provide the Root DN password when prompted.
Leave the LDAP browser with .
4.7. Manually Configuring an LDAP Server
YaST uses OpenLDAP's dynamic configuration database
(back-config) to store the LDAP server's
configuration. For details about the dynamic configuration backend please
see the slapd-config(5) man page or the OpenLDAP
Software 2.4 Administrator's Guide located at
/usr/share/doc/packages/openldap2/guide/admin/guide.html
on your system if the openldap2 package is
installed.
![[Tip]](admon/tip.png) | Upgrading an Old OpenLDAP Installation |
|---|---|
YaST does not use | |
To conveniently access the configuration backend, you use SASL external
authentication. For example, the following ldapsearch
command executed as root can be used to show the
complete slapd configuration:
ldapsearch -Y external -H ldapi:/// -b cn=config
4.7.1. Запуск и остановка серверов
Как только сервер LDAP полностью настроен и все необходимые записи
сделаны согласно образцу, описанному в
Раздел 4.8, «Управление данными в каталоге LDAP», запустите сервер с правами
пользователя root, введя
команду rcldap start. Для остановки
сервера вручную, введите rcldap stop.
Запросить статус запущенного сервера можно с помощью команды
rcldap status.
Редактор уровня запуска YaST можно использовать для запуска и остановки сервера при загрузке и остановке системы соответственно. Также есть возможность создать символические ссылки для скриптов старта и остановки с помощью команды insserv.
4.8. Управление данными в каталоге LDAP
OpenLDAP предоставляет серию инструментов для администрирования данными в каталоге LDAP. Четыре наиболее важных инструмента для добавления, удаления, поиска и изменения набора данных кратко описаны ниже.
4.8.1. Вставка данных в каталог LDAP
Если конфигурация вашего сервера LDAP выполнена корректно и
готова к использованию (имеются соответствующие записи для
suffix, directory,
rootdn, rootpw и
index), то можно приступить к вводу записей. Для этой
задачи OpenLDAP предоставляет команду ldapadd. Если
возможность — добавляйте объекты в базу данных в связке (по вполне
практичным причинам). Для этого в LDAP присутствует поддержка обработки
данных в формате LDIF (LDAP data interchange format — Формат обмена
данными LDAP). Файл LDIF — это простой тестовый файл, содержащий
произвольное количество пар атрибутов и значений.
Файл LDIF для создания структуры приведен, например, на
Рисунок 4.1, «Структура каталога LDAP» мог бы выглядеть, как в
Пример 4.2, «Пример файла LDIF».
![[Important]](admon/important.png) | Кодировка файлов LDIF |
|---|---|
LDAP работает с UTF-8 (Юникод). Умляуты должны кодироваться правильно. В противном случае, избегайте использования умляутов и других специальных символов или используйте iconv для перевода кодировки в UTF-8. | |
Пример 4.2. Пример файла LDIF
# The Organization
dn: dc=example,dc=com
objectClass: dcObject
objectClass: organization
o: Example dc: example

# The organizational unit development (devel)
dn: ou=devel,dc=example,dc=com
objectClass: organizationalUnit
ou: devel

# The organizational unit documentation (doc)
dn: ou=doc,dc=example,dc=com
objectClass: organizationalUnit
ou: doc

# The organizational unit internal IT (it)
dn: ou=it,dc=example,dc=com
objectClass: organizationalUnit
ou: it
Сохраните файл с суффиксом .ldif, затем отправьте
его на сервер с помощью следующей команды:
ldapadd -x -Ddn_of_the_administrator-W -ffile.ldif
Ключ -x, в данном случае, отключает аутентификацию с
помощью SASL. Ключ -D указывает пользователя от имени
которого инициируется данное действие. Действительный DN администратора,
введенный здесь, должен быть таким же, как в файле
slapd.conf. В данном примере, это
cn=Administrator,dc=example,dc=com.
Ключ -W предотвращает ввод пароля в командной строке
(открытым текстом) и активирует отдельное приглашение для ввода пароля.
С помощью ключа -f указывается имя файла. Детали работы
ldapadd можно посмотреть в Пример 4.3, «ldapadd и example.ldif».
Пример 4.3. ldapadd и example.ldif
ldapadd -x -D cn=Administrator,dc=example,dc=com -W -f example.ldif

Enter LDAP password:
adding new entry "dc=example,dc=com"
adding new entry "ou=devel,dc=example,dc=com"
adding new entry "ou=doc,dc=example,dc=com"
adding new entry "ou=it,dc=example,dc=com"
Данные конкретного пользователя могут быть подготовлены в отдельном файле LDIF.
В Пример 4.4, «Данные LDIF для пользователя Tux» пользователь
Tux добавляется в новый каталог LDAP.
Пример 4.4. Данные LDIF для пользователя Tux
# coworker Tux
dn: cn=Tux Linux,ou=devel,dc=example,dc=com
objectClass: inetOrgPerson
cn: Tux Linux
givenName: Tux
sn: Linux
mail: tux@example.com
uid: tux
telephoneNumber: +49 1234 567-8
Файл LDIF может содержать произвольное количество объектов. Возможно сразу отправить полные ветви каталога на сервер или только его часть, как показано в примере для конкретных объектов. Если требуется менять отдельные данные достаточно часто, то рекомендуется использовать для этого отдельную часть одиночного объекта.
4.8.2. Модификация данных в каталоге LDAP
Для модификации набора данных предоставляется команда ldapmodify
Наиболее простой способ сделать это — изменить соответствующий файл LDIF, а
затем отправить его на сервер. Так, для того, чтобы изменить номер телефона коллеги
Tux с +8 1234 5 67-08
на +8 1234 5 67-10 отредактируйте LDIF-файл, как показано в
Пример 4.5, «Изменение файла tux.ldif».
Пример 4.5. Изменение файла tux.ldif
# coworker Tux
dn: cn=Tux Linux,ou=devel,dc=example,dc=com
changetype: modify
replace: telephoneNumber
telephoneNumber: +8 1234 5 67-10
Импортируйте измененный файл в каталог LDAP с помощью следующей команды:
ldapmodify -x -D cn=Administrator,dc=example,dc=com -W -f tux.ldif
Или отправьте измененные атрибуты напрямую с помощью команды ldapmodify:
Запустите ldapmodify и введите пароль:
ldapmodify -x -D cn=Administrator,dc=example,dc=com -W
Enter LDAP password:
Введите измененные данные (внимательно следите за правильностью синтаксиса) в порядке приведенном ниже:
dn: cn=Tux Linux,ou=devel,dc=example,dc=com
changetype: modify
replace: telephoneNumber
telephoneNumber: +8 1234 5 67-10
Более подробную информацию о команде ldapmodify и его синтаксисе смотрите на соответствующей man-странице.
4.8.3. Поиск и чтение данных из каталога LDAP
OpenLDAP представляет инструмент командной строки для поиска и чтения данных внутри каталога LDAP — ldapsearch. Простой запрос можно выполнить следующим образом:
ldapsearch -x -b dc=example,dc=com "(objectClass=*)"
Ключ -b задет базу для поиска (раздел дерева, внутри которого
будет производиться поиск). В данном случае, это dc=example,dc=com.
Чтобы выполнить более подробный поиск в конкретном подразделе каталога LDAP
(например, только в пределах раздела devel), укажите его
ldapsearch с помощью ключа -b.
Ключ -x запрашивает активацию простой авторизации.
Строка (objectClass=*) объявляет, что необходимо прочитать
все объекты, содержащиеся в каталоге. Эта опция может использоваться для проверки,
что все записи были указаны правильно и сервер отвечает корректно, например,
после создания нового дерева каталогов. Дополнительную информацию об использовании
этой команды можно найти на man-странице ldapsearch(1).
4.8.4. Удаление данных из каталога LDAP
Удалить нежелательные записи можно с помощью команды ldapdelete.
Её синтаксис схож с синтаксисом описанных выше команд. Например, чтобы удалить всю
информацию о связанной с записью Tux Linux, запустите следующую
команду:
ldapdelete -x -D cn=Administrator,dc=example,dc=com -W cn=Tux \
Linux,ou=devel,dc=example,dc=com
4.9. For More Information
More complex subjects (like SASL configuration or establishment of a replicating LDAP server that distributes the workload among multiple slaves) were omitted from this chapter. Find detailed information about both subjects in the OpenLDAP 2.4 Administrator's Guide—see at OpenLDAP 2.4 Administrator's Guide.
The Web site of the OpenLDAP project offers exhaustive documentation for beginner and advanced LDAP users:
- OpenLDAP Faq-O-Matic
A detailed question and answer collection applying to the installation, configuration, and use of OpenLDAP. Find it at http://www.openldap.org/faq/data/cache/1.html.
- Quick Start Guide
Brief step-by-step instructions for installing your first LDAP server. Find it at http://www.openldap.org/doc/admin24/quickstart.html or on an installed system in Section 2 of
/usr/share/doc/packages/openldap2/guide/admin/guide.html.- OpenLDAP 2.4 Administrator's Guide
A detailed introduction to all important aspects of LDAP configuration, including access controls and encryption. See http://www.openldap.org/doc/admin24/ or, on an installed system,
/usr/share/doc/packages/openldap2/guide/admin/guide.html.- Understanding LDAP
A detailed general introduction to the basic principles of LDAP: http://www.redbooks.ibm.com/redbooks/pdfs/sg244986.pdf.
Printed literature about LDAP:
LDAP System Administration by Gerald Carter (ISBN 1-56592-491-6)
Understanding and Deploying LDAP Directory Services by Howes, Smith, and Good (ISBN 0-672-32316-8)
The ultimate reference material for the subject of LDAP are the corresponding RFCs (request for comments), 2251 to 2256.
