Chapter 12. Installing Multiple Kernel Versions
Contents
Abstract
openSUSE supports the parallel installation of multiple kernel versions. When installing a second kernel, a boot entry and an initrd are automatically created, so no further manual configuration is needed. When rebooting the machine, the newly added kernel is available as an additional boot option.
Using this functionality, you can safely test kernel updates while being able to always fall back to the proven former kernel. To do so, do not use the update tools (such as the YaST Online Update or the updater applet), but instead follow the process described in this chapter.
![[Warning]](admon/warning.png) | Support Entitlement |
|---|---|
Please be aware that you loose your entire support entitlement for the machine when installing a self-compiled or a third-party kernel. Only kernels shipped with openSUSE and kernels delivered via the official update channels for openSUSE are supported. | |
![[Tip]](admon/tip.png) | Check Your Bootloader Configuration Kernel |
|---|---|
It is recommended to check your bootloader config after having installed
another kernel in order to set the default boot entry of your choice. See
Раздел “Configuring the Boot Loader with YaST” (Глава 6, The Boot Loader GRUB, ↑Содержание) for more information. To change
the default append line for new kernel installations, adjust
| |
12.1. Enabling and Configuring Multiversion Support
Installing multiple versions of a software package (multiversion support) is not enabled by default. To enable this feature, proceed as follows:
Open
/etc/zypp/zypp.confwith the editor of your choice asroot.Search for the string
multiversion. To enable multiversion for all kernel packages capable of this feature, uncomment the following line# multiversion = provides:multiversion(kernel)
To restrict multiversion support to certain kernel flavors, add the package names as a comma-separated list, to the
multiversionoption in/etc/zypp/zypp.conf—for examplemultiversion = kernel-default,kernel-default-base,kernel-source
Save your changes.
12.1.1. Automatically Deleting Unused Kernels
When frequently testing new kernels with multiversion support enabled,
the boot menu quickly becomes confusing. Since a
/boot usually has got limited space you also might
run into trouble with /boot overflowing. While you
may delete unused kernel versions manually with YaST or zypper (as
described below), you can also configure
libzypp to automatically delete
kernels no longer used. By default no kernels are deleted.
Open
/etc/zypp/zypp.confwith the editor of your choice asroot.Search for the string
multiversion.kernelsand activate this option by uncommenting the line. This option takes a comma separated list of the following values2.6.32.12-0.7latest: keep the kernel with the highest version numberlatest-N: keep the kernel with the Nth highest version numberrunning. keep the running kerneloldest. keep the kernel with the lowest version number (the one that was originally shipped with openSUSE)oldest+N. keep the kernel with the Nth lowest version numberHere are some examples
multiversion.kernels = latest,runningKeep the latest kernel and the one currently running one. This is similar to not enabling the multiversion feature at all, except that the old kernel is removed after the next reboot and not immediately after the installation.
multiversion.kernels = latest,latest-1,runningKeep the last two kernels and the one currently running.
multiversion.kernels = latest,running,3.0.rc7-testKeep the latest kernel, the one currently running and
3.0.rc7-test.
![[Tip]](admon/tip.png)
Keep the runningKernelUnless using special setups, you probably always want to keep the
runningkernel.
12.2. Installing/Removing Multiple Kernel Versions with YaST
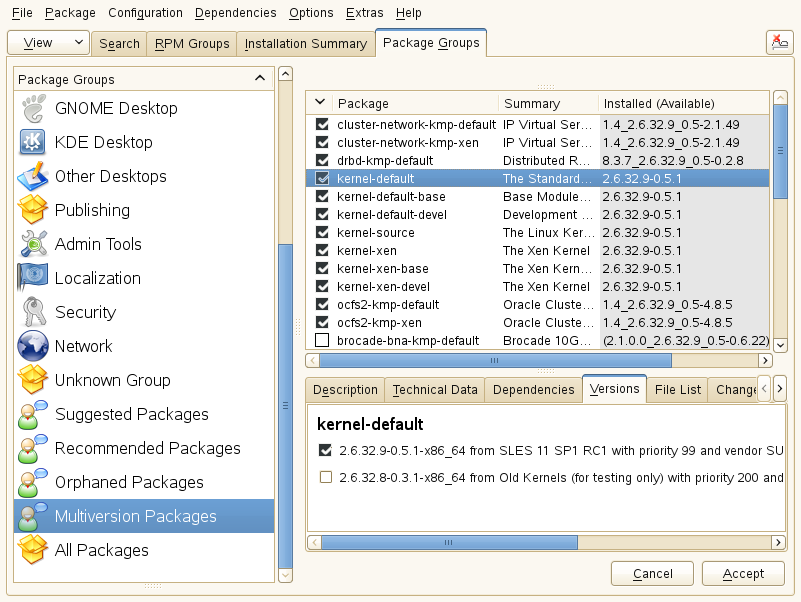
Start YaST and open the software manager via +.
List all packages capable of providing multiple versions by choosing ++.
Select a package and open its tab in the bottom pane on the left.
To install a package, click its checkbox. A green check mark indicates it is selected for installation.
To remove an already installed package (marked with a white check mark), click its checkbox until a red
Xindicates it is selected for removal.Click to start the installation.
12.3. Installing/Removing Multiple Kernel Versions with zypper
Use the command zypper se -s 'kernel*' to display a list of all kernel packages available:
S | Name           | Type       | Version         | Arch   | Repository
--+----------------+------------+-----------------+--------+-------------------
v | kernel-default | package    | 2.6.32.10-0.4.1 | x86_64 | Alternative Kernel
i | kernel-default | package    | 2.6.32.9-0.5.1  | x86_64 | (System Packages)
  | kernel-default | srcpackage | 2.6.32.10-0.4.1 | noarch | Alternative Kernel
i | kernel-default | package    | 2.6.32.9-0.5.1  | x86_64 | (System Packages)
...
Specify the exact version when installing:
zypper in kernel-default-2.6.32.10-0.4.1
When uninstalling a kernel, use the commands zypper se -si 'kernel*' to list all kernels installed and zypper rm
PACKAGENAME-VERSIONto remove the package.
