Глава 13. Time Synchronization with NTP
Содержание
Аннотация
The NTP (network time protocol) mechanism is a protocol for synchronizing the system time over the network. First, a machine can obtain the time from a server that is a reliable time source. Second, a machine can itself act as a time source for other computers in the network. The goal is twofold—maintaining the absolute time and synchronizing the system time of all machines within a network.
Maintaining an exact system time is important in many situations. The built-in hardware (BIOS) clock does often not meet the requirements of applications such as databases or clusters. Manual correction of the system time would lead to severe problems because, for example, a backward leap can cause malfunction of critical applications. Within a network, it is usually necessary to synchronize the system time of all machines, but manual time adjustment is a bad approach. NTP provides a mechanism to solve these problems. The NTP service continuously adjusts the system time with the help of reliable time servers in the network. It further enables the management of local reference clocks, such as radio-controlled clocks.
13.1. Configuring an NTP Client with YaST
The NTP daemon (ntpd) coming with the
ntp package is preset to use the local computer
clock as a time reference. Using the (BIOS) clock, however, only serves
as a fallback for cases where no time source of better precision is
available. YaST facilitates the configuration of an NTP client.
13.1.1. Basic Configuration
The YaST NTP client configuration (+) consists of tabs. Set the start mode of ntpd and the server to query on the tab.
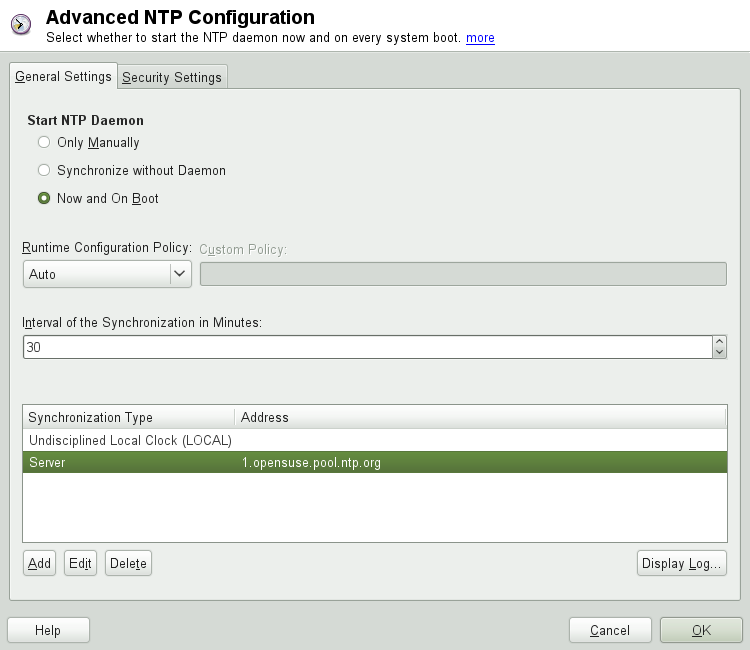
Select , if you want to configure everything on your own.
On laptops and other machines that suspend automatically, select . Using this mode, YaST does not start ntpd on the local machine for synchronizing. Instead YaST creates a crontab entry (
/etc/cron.d/novell.ntp-synchronize) that checks the time with the time server as specified in the field. For more information about cron, see Раздел 7.1.2, «The cron Package».Select to start ntpd automatically when the system is booted. Either of
0.opensuse.pool.ntp.org,1.opensuse.pool.ntp.org,2.opensuse.pool.ntp.org, or3.opensuse.pool.ntp.orgis pre-selected.
13.1.2. Changing Basic Configuration
The servers and other time sources for the client to query are listed in the lower part of the tab. Modify this list as needed with , , and . provides the possibility to view the log files of your client.
Click to add a new source of time information. In the following dialog, select the type of source with which the time synchronization should be made. The following options are available:
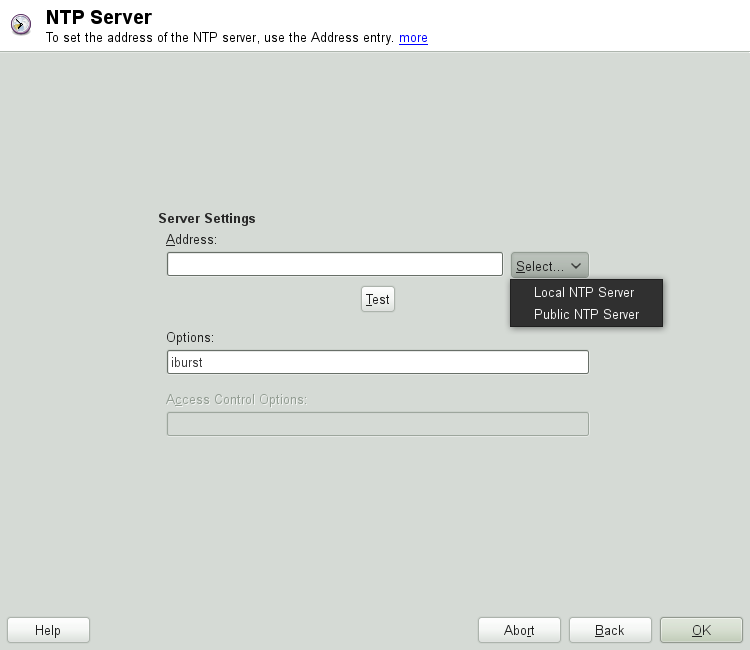
- Server
In the pull-down list (see Рисунок 13.2, «YaST: NTP Server», determine whether to set up time synchronization using a time server from your local network () or an Internet-based time server that takes care of your time zone (). For a local time server, click to start an SLP query for available time servers in your network. Select the most suitable time server from the list of search results and exit the dialog with . For a public time server, select your country (time zone) and a suitable server from the list under then exit the dialog with . In the main dialog, test the availability of the selected server with .
Another dialog enables you to select an NTP server. Activate to trigger the synchronization of the time information between the server and the client when the system is booted. allows you to specify additional options for ntpd.
Using , you can restrict the actions that the remote computer can perform with the daemon running on your computer. This field is enabled only after checking on the tab (see Рисунок 13.3, «Advanced NTP Configuration: Security Settings»). The options correspond to the
restrictclauses in/etc/ntp.conf. For example,nomodify notrap noquerydisallows the server to modify NTP settings of your computer and to use the trap facility (a remote event logging feature) of your NTP daemon. Using these restrictions is recommended for servers out of your control (for example, on the Internet).Refer to
/usr/share/doc/packages/ntp-doc(part of thentp-docpackage) for detailed information.- Peer
A peer is a machine to which a symmetric relationship is established: it acts both as a time server and as a client. To use a peer in the same network instead of a server, enter the address of the system. The rest of the dialog is identical to the dialog.
- Radio Clock
To use a radio clock in your system for the time synchronization, enter the clock type, unit number, device name, and other options in this dialog. Click to fine-tune the driver. Detailed information about the operation of a local radio clock is available in
/usr/share/doc/packages/ntp-doc/refclock.html.- Outgoing Broadcast
Time information and queries can also be transmitted by broadcast in the network. In this dialog, enter the address to which such broadcasts should be sent. Do not activate broadcasting unless you have a reliable time source like a radio controlled clock.
- Incoming Broadcast
If you want your client to receive its information via broadcast, enter the address from which the respective packets should be accepted in this fields.
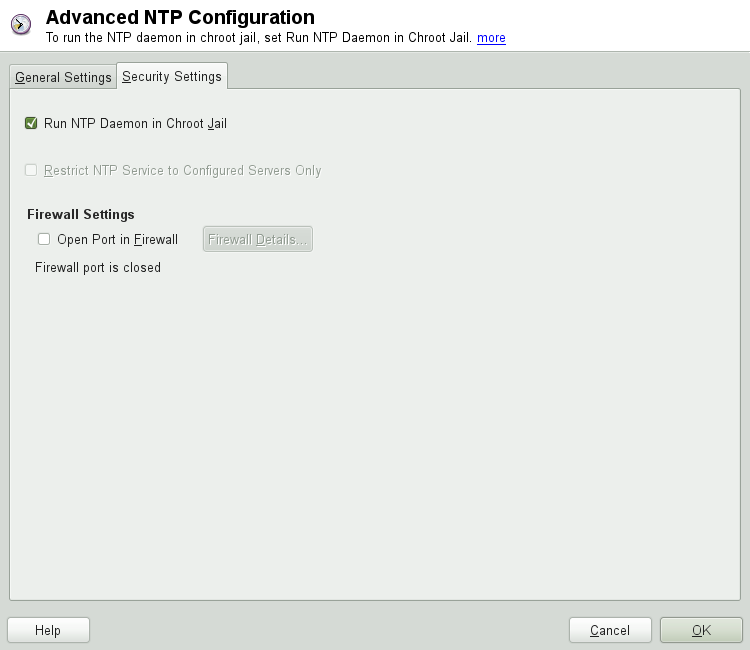
In the tab (see Рисунок 13.3, «Advanced NTP Configuration: Security Settings»), determine whether ntpd should be started in a chroot jail. By default, is activated. This increases the security in the event of an attack over ntpd, as it prevents the attacker from compromising the entire system.
increases the security of your system by disallowing remote computers to view and modify NTP settings of your computer and to use the trap facility for remote event logging. Once enabled, these restrictions apply to all remote computers, unless you override the access control options for individual computers in the list of time sources in the tab. For all other remote computers, only querying for local time is allowed.
Enable if SuSEfirewall2 is active (which it is by default). If you leave the port closed, it is not possible to establish a connection to the time server.
13.2. Manually Configuring ntp in the Network
The easiest way to use a time server in the network is to set server
parameters. For example, if a time server called
ntp.example.com is reachable from the network, add its
name to the file /etc/ntp.conf by adding the
following line:
server ntp.example.com
To add more time servers, insert additional lines with the keyword
server. After initializing ntpd with the command
rcntp start, it takes about one hour
until the time is stabilized and the drift file for correcting the local
computer clock is created. With the drift file, the systematic error of
the hardware clock can be computed as soon as the computer is powered on.
The correction is used immediately, resulting in a higher stability of
the system time.
There are two possible ways to use the NTP mechanism as a client: First, the client can query the time from a known server in regular intervals. With many clients, this approach can cause a high load on the server. Second, the client can wait for NTP broadcasts sent out by broadcast time servers in the network. This approach has the disadvantage that the quality of the server is unknown and a server sending out wrong information can cause severe problems.
If the time is obtained via broadcast, you do not need the server name.
In this case, enter the line broadcastclient in the
configuration file /etc/ntp.conf. To use one or more
known time servers exclusively, enter their names in the line starting
with servers.
13.3. Dynamic Time Synchronization at Runtime
If the system boots without network connection, ntpd starts up, but it cannot resolve DNS names of the time servers set in the configuration file. This can happen if you use Network Manager with an encrypted WLAN.
If you want ntpd to resolve DNS names at runtime, you must set the
dynamic option. Then, when the network is
establish some time after booting, ntpd looks up the names again and can
reach the time servers to get the time.
Manually edit /etc/ntp.conf and add
dynamic to one or more
server entries:
server ntp.example.com dynamic
Or use YaST and proceed as follows:
In YaST click +.
Select the server you want to configure. Then click .
Activate the field and add
dynamic. Separate it with a space, if there are already other options entered.Click to close the edit dialog. Repeat the previous step to change all servers as wanted.
Finally click to save the settings.
13.4. Setting Up a Local Reference Clock
The software package ntp contains drivers for connecting local reference
clocks. A list of supported clocks is available in the
ntp-doc package in the file
/usr/share/doc/packages/ntp-doc/refclock.html. Every
driver is associated with a number. In ntp, the actual configuration
takes place by means of pseudo IP addresses. The clocks are entered in
the file /etc/ntp.conf as though they existed in the
network. For this purpose, they are assigned special IP addresses in the
form
127.127..
Here, t.ut stands for the type of the clock and
determines which driver is used and u for the
unit, which determines the interface used.
Normally, the individual drivers have special parameters that describe
configuration details. The file
/usr/share/doc/packages/ntp-doc/drivers/driver
(where NN.htmlNN is the number of the driver)
provides information about the particular type of clock. For example, the
«type 8» clock (radio clock over serial interface)
requires an additional mode that specifies the clock more precisely. The
Conrad DCF77 receiver module, for example, has mode 5. To use this
clock as a preferred reference, specify the keyword
prefer. The complete server line
for a Conrad DCF77 receiver module would be:
server 127.127.8.0 mode 5 prefer
Other clocks follow the same pattern. Following the installation of the
ntp-doc package, the
documentation for ntp is available in the directory
/usr/share/doc/packages/ntp-doc. The file
/usr/share/doc/packages/ntp-doc/refclock.html
provides links to the driver pages describing the driver parameters.