Глава 14. Sharing File Systems with NFS
Содержание
Аннотация
Distributing and sharing file systems over a network is a common task in corporate environments. The well-proven network file system (NFS) works together with NIS, the yellow pages protocol. For a more secure protocol that works together with LDAP and may also use Kerberos, check NFSv4.
NFS with NIS makes a network transparent to the user. With NFS, it is possible to distribute arbitrary file systems over the network. With an appropriate setup, users always find themselves in the same environment regardless of the terminal they currently use.
![[Important]](admon/important.png) | Need for DNS |
|---|---|
In principle, all exports can be made using IP addresses only. To avoid time-outs, you need a working DNS system. DNS is necessary at least for logging purposes, because the mountd daemon does reverse lookups. | |
14.1. Terminology
The following are terms used in the YaST module.
- Exports
A directory exported by an NFS server, which clients can integrate it into their system.
- NFS Client
The NFS client is a system that uses NFS services from an NFS server over the Network File System protocol. The TCP/IP protocol is already integrated into the Linux kernel; there is no need to install any additional software.
- NFS Server
The NFS server provides NFS services to clients. A running server depends on the following daemons:
nfsd(worker),idmapd(user and group name mappings to IDs and vice versa),statd(file locking), andmountd(mount requests).
14.2. Installing NFS Server
The NFS server software is not part of the default installation. To
install the NFS server software, start YaST and select +. Now choose + and select or use the option and search
for NFS Server. Confirm the installation of the
packages to finish the installation process.
Like NIS, NFS is a client/server system. However, a machine can be both—it can supply file systems over the network (export) and mount file systems from other hosts (import).
14.3. Configuring NFS Server
Configuring an NFS server can be done either through YaST or manually. For authentication, NFS can also be combined with Kerberos.
14.3.1. Exporting File Systems with YaST
With YaST, turn a host in your network into an NFS server—a server that exports directories and files to all hosts granted access to it. The server can also provide applications to all members of a group without installing the applications locally on each and every host. To set up such a server, proceed as follows:
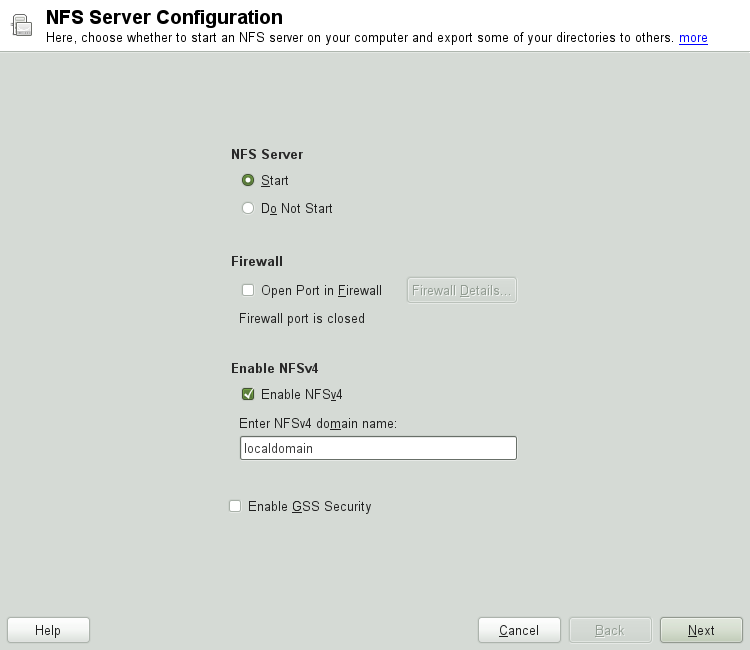
Start YaST and select +; see Рисунок 14.1, «NFS Server Configuration Tool».
Activate the radio button and enter the .
Click if you need secure access to the server. A prerequisite for this is to have Kerberos installed on your domain and to have both the server and the clients kerberized. Click .
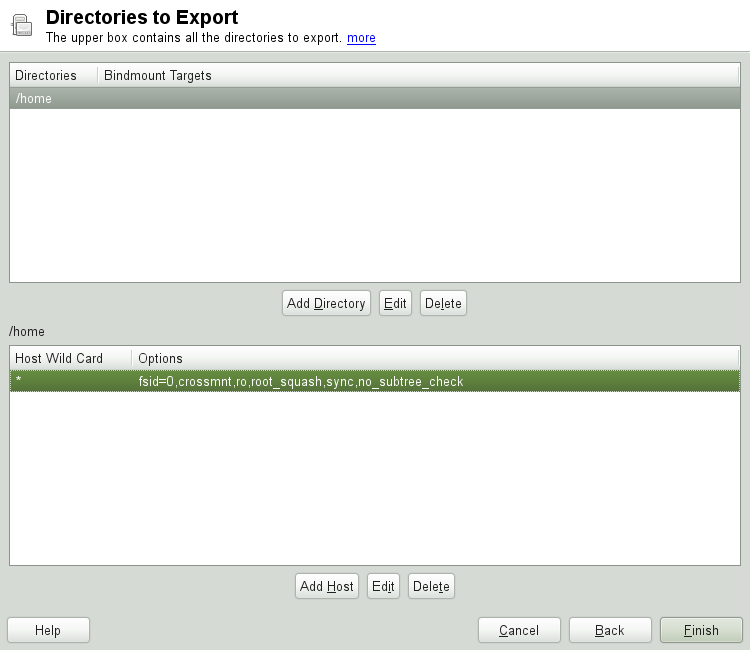
Enter the directories to export in the upper text field. Below, enter the hosts that should have access to them. This dialog is shown in Рисунок 14.2, «Configuring an NFS Server with YaST».
The figure shows the scenario where NFSv4 is enabled in the previous dialog.
Bindmount Targetsis shown in the right pane. For more details, click . In the lower half of the dialog, there are four options that can be set for each host:single host,netgroups,wildcards, andIP networks. For a more thorough explanation of these options, refer to theexportsman page.Click to complete the configuration.
| Automatic Firewall Configuration |
|---|---|
If a firewall is active on your system (SuSEfirewall2), YaST adapts
its configuration for the NFS server by enabling the
| |
14.3.1.1. Exporting for NFSv4 Clients
Activate to support NFSv4 clients. Clients with NFSv3 can still access the server's exported directories if they are exported appropriately. This is explained in detail in Раздел 14.3.1.3, «Coexisting v3 and v4 Exports».
After activating NFSv4, enter an appropriate domain name. Make sure the
name is the same as the one in the
/etc/idmapd.conf file of any NFSv4 client that accesses this
particular server. This parameter is for the idmapd service that is
required for NFSv4 support (on both server and client). Leave it as
localdomain (the default) if you do not have special
requirements. For more information, see the links in
Раздел 14.5, «For More Information».
Click . The dialog that follows has two sections. The upper half consists of two columns named and . is a directly editable column that lists the directories to export.
For a fixed set of clients, there are two types of directories that can be exported—directories that act as pseudo root file systems and those that are bound to some subdirectory of the pseudo file system. This pseudo file system acts as a base point under which all file systems exported for the same client set take their place. For a client or set of clients, only one directory on the server can be configured as pseudo root for export. For this client, export multiple directories by binding them to some existing subdirectory in the pseudo root.
In the lower half of the dialog, enter the client (wild card) and export options for a particular directory. After adding a directory in the upper half, another dialog for entering the client information and options pops up automatically. After that, to add a new client or a set of clients, click .
In the small dialog that opens, enter the host wild card. There are
four possible types of host wild cards that can be set for each host: a
single host (name or IP address), netgroups, wild cards (such as
* indicating all machines can access the server),
and IP networks. Then, in , include
fsid=0 in the comma-separated list of options to
configure the directory as pseudo root. If this directory needs to be
bound to another directory under an already configured pseudo root,
make sure that a target bind path is given in the option list with
bind=/target/path.
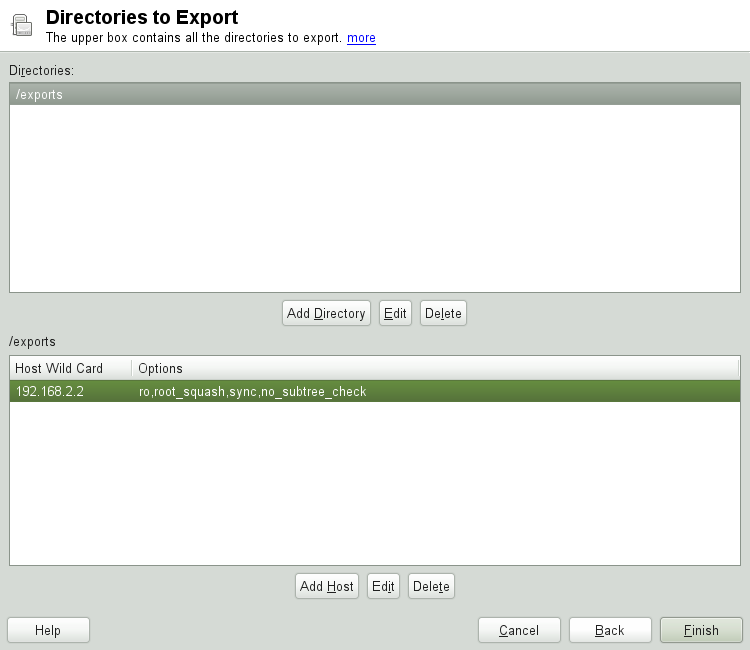
For example, suppose that the directory /exports
is chosen as the pseudo root directory for all the clients that can
access the server. Then add this in the upper half and make sure that
the options entered for this directory include
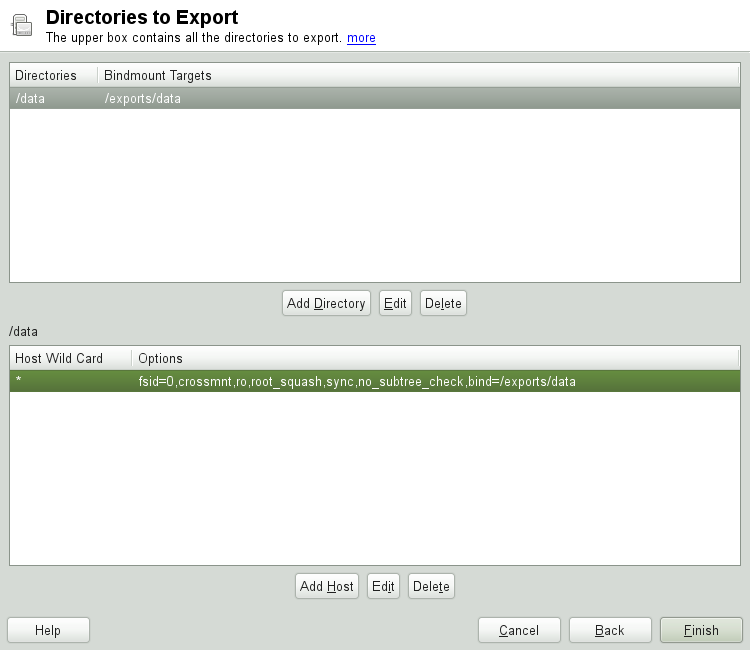
fsid=0. If there is another directory,
/data, that also needs to be NFSv4 exported, add
this directory to the upper half. While entering options for this, make
sure that bind=/exports/data is in the list and that
/exports/data is an already existing subdirectory
of /exports. Any change in the option
bind=/target/path, whether addition, deletion,
or change in value, is reflected in . This column is not a directly editable column, but
instead summarizes directories and their nature. After all information
is provided, click to complete the
configuration. The service will become available immediately.
14.3.1.2. NFSv3 and NFSv2 Exports
Make sure that is not checked in the initial dialog before clicking .
The next dialog has two parts. In the upper text field, enter the
directories to export. Below, enter the hosts that should have access
to them. There are four types of host wild cards that can be set for
each host: a single host (name or IP address), netgroups, wild cards
(such as * indicating all machines can access the
server), and IP networks.
This dialog is shown in Рисунок 14.4, «Exporting Directories with NFSv2 and v3». Find a more thorough explanation of these options in man exports. Click to complete the configuration.
14.3.1.3. Coexisting v3 and v4 Exports
NFSv3 and NFSv4 exports can coexist on a server. After enabling the
support for NFSv4 in the initial configuration dialog, those exports
for which fsid=0 and
bind=/target/path are not included in the
option list are considered v3 exports. Consider the example in
Рисунок 14.2, «Configuring an NFS Server with YaST».
If you add another directory, such as /data2,
using then in the corresponding
options list do not mention either fsid=0 or
bind=/target/path, this export acts as a v3
export.
| |
Automatic Firewall Configuration
If SuSEfirewall2 is active on your system, YaST adapts its
configuration for the NFS server by enabling the
| |
14.3.2. Exporting File Systems Manually
The configuration files for the NFS export service are
/etc/exports and
/etc/sysconfig/nfs. In addition to these files,
/etc/idmapd.conf is needed for the NFSv4 server
configuration. To start or restart the services, run the command
rcnfsserver restart. This also starts the
rpc.idmapd if NFSv4 is configured in
/etc/sysconfig/nfs. The NFS server depends on a
running RPC portmapper. Therefore, also start or restart the portmapper
service with rcrpcbind restart.
14.3.2.1. Exporting File Systems with NFSv4
NFSv4 is the latest version of NFS protocol available on openSUSE. Configuring directories for export with NFSv4 differs slightly from previous NFS versions.
14.3.2.1.1. /etc/exports
The /etc/exports file contains a list of entries.
Each entry indicates a directory that is shared and how it is shared.
A typical entry in /etc/exports consists of:
/shared/directory host(option_list)
For example:
/export   192.168.1.2(rw,fsid=0,sync,crossmnt)
/export/data   192.168.1.2(rw,bind=/data,sync)
Here the IP address 192.168.1.2 is used to identify
the allowed client. You can also use the name of the host, a wild card
indicating a set of hosts (*.abc.com,
*, etc.), or netgroups
(@my-hosts).
The directory which specifies fsid=0 is special. It
is the root of the filesystem that is exported, sometimes referred to
as the pseudo root filesystem. This directory must also have the
crossmnt for correct operation with NFSv4. All
other directories exported via NFSv4 must be mounted below this point.
If you want to export a directory that is not within the exported
root, it needs to be bound into the exported tree. This can be done
using the bind= syntax.
In the example above, /data is not within
/export, so we export
/export/data, and specify that the
/data directory should be bound to that name. The
directory /export/data must exist and should
normally be empty.
When clients mount from this server, they just mount
servername:/ rather than
servername:/export. It is not necessary to mount
servername:/data, because it will automatically
appear beneath wherever servername:/ was mounted.
14.3.2.1.2. /etc/sysconfig/nfs
The /etc/sysconfig/nfs file contains a few
parameters that determine NFSv4 server daemon behavior. It is
important to set the parameter NFS4_SUPPORT
to yes. NFS4_SUPPORT
determines whether the NFS server supports NFSv4 exports and clients.
14.3.2.1.3. /etc/idmapd.conf
Every user on a Linux machine has a name and ID. idmapd does the name-to-ID mapping for NFSv4 requests to the server and replies to the client. It must be running on both server and client for NFSv4, because NFSv4 uses only names for its communication.
Make sure that there is a uniform way in which usernames and IDs (uid) are assigned to users across machines that might probably be sharing file systems using NFS. This can be achieved by using NIS, LDAP, or any uniform domain authentication mechanism in your domain.
The parameter Domain must be set the same for both,
client and server in the /etc/idmapd.conf file.
If you are not sure, leave the domain as
localdomain in the server and client files. A
sample configuration file looks like the following:
[General]

Verbosity = 0
Pipefs-Directory = /var/lib/nfs/rpc_pipefs
Domain = localdomain

[Mapping]

Nobody-User = nobody
Nobody-Group = nobody
For further reference, read the man page of idmapd
and idmapd.conf; man idmapd,
man idmapd.conf.
14.3.2.1.4. Starting and Stopping Services
After changing /etc/exports or
/etc/sysconfig/nfs, start or restart the NFS
server service with rcnfsserver restart. After
changing /etc/idmapd.conf, reload the
configuration file with the command killall -HUP
rpc.idmapd.
If the NFS service needs to start at boot time, run the command chkconfig nfsserver on.
14.3.2.2. Exporting File Systems with NFSv2 and NFSv3
This section is specific to NFSv3 and NFSv2 exports. Refer to Раздел 14.3.1.1, «Exporting for NFSv4 Clients» for exporting with NFSv4.
Exporting file systems with NFS involves two configuration files:
/etc/exports and
/etc/sysconfig/nfs. A typical
/etc/exports file entry is in the format:
/shared/directory host(list_of_options)
For example:
/export 192.168.1.2(rw,sync)
Here, the directory /export is shared with the
host 192.168.1.2 with the option list
rw,sync. This IP address can be replaced with
a client name or set of clients using a wild card (such as
*.abc.com) or even netgroups.
For a detailed explanation of all options and their meaning, refer to the man page of exports (man exports).
After changing /etc/exports or
/etc/sysconfig/nfs, start or restart the NFS
server using the command rcnfsserver restart.
14.3.3. NFS with Kerberos
To use Kerberos authentication for NFS, GSS security must be enabled. Select in the initial YaST NFS Server dialog. You must have a working Kerberos server to use this feature. YaST does not set up the server but just uses the provided functionality. If you want to use Kerberos authentication in addition to the YaST configuration, complete at least the following steps before running the NFS configuration:
Make sure that both the server and the client are in the same Kerberos domain. They must access the same KDC (Key Distribution Center) server and share their
krb5.keytabfile (the default location on any machine is/etc/krb5.keytab). For more information about Kerberos, see Глава 6, Сетевая аутентификация при помощи Kerberos (↑Руководство по безопасности).Start the gssd service on the client with rcgssd start.
Start the svcgssd service on the server with rcsvcgssd start.
For more information about configuring kerberized NFS, refer to the links in Раздел 14.5, «For More Information».
14.4. Configuring Clients
To configure your host as an NFS client, you do not need to install additional software. All needed packages are installed by default.
14.4.1. Importing File Systems with YaST
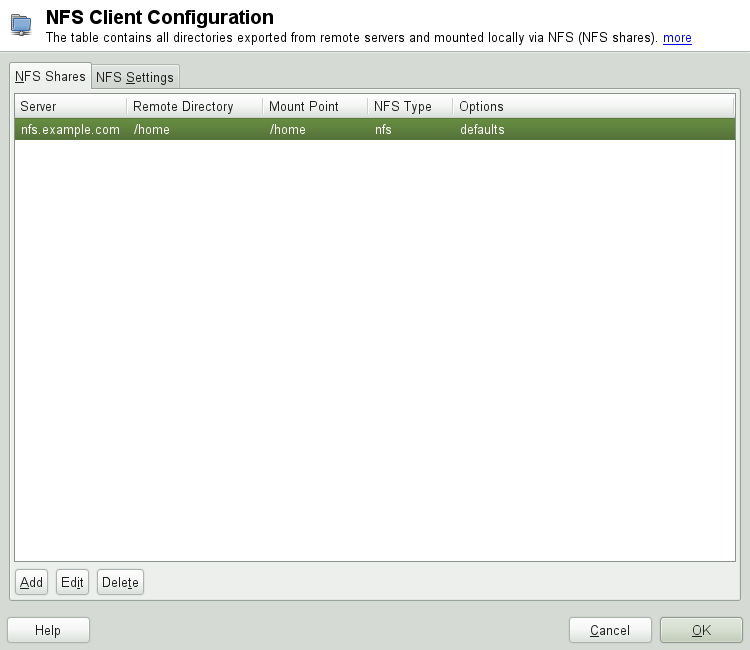
Authorized users can mount NFS directories from an NFS server into the local file tree using the YaST NFS client module. Click on and enter the hostname of the NFS server, the directory to import, and the mount point at which to mount this directory locally. The changes will take effect after clicking in the first dialog.
In the tab, enable to allow access to the service from remote computers.
The firewall status is displayed next to the check box. When using
NFSv4, make sure that the checkbox is
selected and that the contains the
same value as used by the NFSv4 server. The default domain is
localdomain.
Click to save your changes. See Рисунок 14.5, «NFS Client Configuration with YaST».
The configuration is written to /etc/fstab and the
specified file systems are mounted. When you start the YaST
configuration client at a later time, it also reads the existing
configuration from this file.
14.4.2. Importing File Systems Manually
The prerequisite for importing file systems manually from an NFS server
is a running RPC port mapper. Start it by entering rcrpcbind
start as
root. Then remote file systems
can be mounted in the file system like local partitions using
mount:
mounthost:remote-pathlocal-path
To import user directories from the nfs.example.com
machine, for example, use:
mount nfs.example.com:/home /home
14.4.2.1. Using the Automount Service
The autofs daemon can be used to mount remote file systems
automatically. Add the following entry in the your
/etc/auto.master file:
/nfsmounts /etc/auto.nfs
Now the /nfsmounts directory acts as the root for
all the NFS mounts on the client if the auto.nfs
file is filled appropriately. The name auto.nfs is
chosen for the sake of convenience—you can choose any name. In
auto.nfs add entries for all the NFS mounts as
follows:
localdata -fstype=nfs server1:/data
nfs4mount -fstype=nfs4 server2:/
Activate the settings with rcautofs start as
root. In this example, /nfsmounts/localdata,
the /data directory of
server1, is mounted with NFS and
/nfsmounts/nfs4mount from
server2 is mounted with NFSv4.
If the /etc/auto.master file is edited while the
service autofs is running, the automounter must be restarted for the
changes to take effect with rcautofs restart.
14.4.2.2. Manually Editing /etc/fstab
A typical NFSv3 mount entry in /etc/fstab looks
like this:
nfs.example.com:/data /local/path nfs rw,noauto 0 0
NFSv4 mounts may also be added to the /etc/fstab
file. For these mounts, use nfs4 instead of
nfs in the third column and make sure that the
remote file system is given as / after the
nfs.example.com: in the first column. A sample
line for an NFSv4 mount in /etc/fstab looks like
this:
nfs.example.com:/ /local/pathv4 nfs4 rw,noauto 0 0
The noauto option prevents the file system from
being mounted automatically at start up. If you want to mount the
respective file system manually, it is possible to shorten the mount
command specifying the mount point only:
mount /local/path
Note, that if you do not enter the noauto option,
the initialization scripts of the system will handle the mount of those
file systems at start up.
14.5. For More Information
In addition to the man pages of exports,
nfs, and mount, information about
configuring an NFS server and client is available in
/usr/share/doc/packages/nfsidmap/README. For further
documentation online refer to the following Web sites:
Find the detailed technical documentation online at SourceForge.
For instructions for setting up kerberized NFS, refer to NFS Version 4 Open Source Reference Implementation.
If you have questions on NFSv4, refer to the Linux NFSv4 FAQ.